Chik's Crib

28 November 2021

Fresh Ginger Milk Pudding "姜汁撞奶" Recipe

November 28, 2021 0
Fresh Ginger Milk Pudding "姜汁撞奶" Recipe


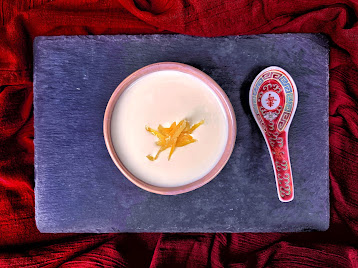
As part of my quest to learn more about traditional desserts, I found this cute little recipe. It's a Cantonese dessert that's not very commonly found, and I don't think I'd seen one before this. It's a quivering bowl of milk pudding, made via an interaction between an enzyme found in ginger, which breaks down and reshapes milk proteins into a more solid texture.  

This is one of those recipes where measuring in volume is better than by weight. It's probably an unpopular opinion, given the current trend of measuring everything in the metric system. But some of ingredients are in minute amounts, so unless you own a precise jeweler scale or the likes, you're probably also better off using a teaspoon for measurement.   

Another point of contention for such an easy recipe: I'm going to be a contrarian and say I prefer using low-fat than full-cream milk. I'd tried using both, and I found full-fat milk too creamy, which distracts away from the sharpness of ginger. 

Fresh Ginger Milk Pudding "姜汁撞奶"
Original Recipe from Red House Spice 

INGREDIENTS

1 tbsp ginger juice (15g ginger would yield about 1 tbsp of juice)
200ml (1 cup) low-fat milk
8g (2tsp) granulated sugar

STEPS 

Peel the ginger. Using the most abrasive side of a box grater, grate the ginger as finely as you can. Grating whole ginger is preferable to using small pieces of ginger, to avoid any grating mishaps. Set a fine sieve over a bowl, and press the grated ginger through the sieve to collect the ginger juice.  

Portion 1 tablespoon of ginger juice in a bowl. Set the bowl aside. 

In a small saucepan set over medium heat, combine milk and sugar. Stir occasionally, keeping a close eye on the milk. When the milk reaches 70°C, remove the pan from the heat (as a rough guide, condensation from the cold milk by the sides of the pot would have fully evaporated around 60C, so that's when you should start using your thermometer.)

Pour the warmed milk into the bowl containing ginger juice. Without stirring, leave the mixture to set in the bowl, about 10 minutes. Serve warm.     

04 October 2021

Chinese Sesame-Soy Dumpling Sauce

October 04, 2021 0
Chinese Sesame-Soy Dumpling Sauce

I had always thought of condiments as a mere accessory to dumplings (just splash some black rice vinegar at the dumplings, amirite?), but my recent dish obsession called 红油抄手 (Sichuan red oil dumplings) have changed my mind.

红油抄手 is a commonly found dish to be honest, and New Shanghai in Melbourne makes a particular terrific version with peanut butter (!) that I'm still thinking about years later. But recent cravings caused me to spend the better part of a month fervently mixing up vinegar, soy sauce and chili in different proportions to get the most flavour out of them. 


I found a good dipping sauce elevates an ordinary dish of dumplings into an outstanding meal. This recipe from The Woks of Life knocks it out of the park. I've tried this sauce in different ways: once to dip for fried dumplings; the other, once as sauce for boiled dumplings (红油抄手). Both are equally excellent.   


Dumpling Sauce

Original Recipe from The Woks of Life
For about a dozen dumplings

I've adjusted to the sauce to my taste, and bumped down the saltiness. I've kept all the ingredients listed in a single unit, which simplifies scaling up/down as required. If you think need a bit more sauce, use a slightly larger spoon, or a tablespoon, a serving spoon, or even a small cup. 

INGREDIENTS
1 teaspoon minced garlic (about 1-2 cloves) 
1 teaspoon sugar
3 teaspoon hot water
4 teaspoon soy sauce 
1 teaspoon black rice vinegar
1 teaspoon chili flakes steeped in chili oil, such as 老干妈 Lao Gan Ma
½ teaspoon sesame oil
1 teaspoon sesame seeds, toasted 

STEPS

Mince garlic. Set aside. 

In a bowl, combine sugar with hot water until well dissolved. Add garlic and the rest of the ingredients (excluding the sesame seed) and stir to combine. 

In a small saucepan set over low heat, lightly toast sesame seeds, about half a minute. Just before serving, stir the sesame seeds into the soy mixture. Serve alongside the dumplings. 

26 September 2021

Kenji López-Alt's Better No-Knead Bread Recipe

September 26, 2021 0
Kenji López-Alt's Better No-Knead Bread Recipe

Warning: this bread will make you take a video, so you can record yourself cutting into the crunchy blistered crust.

The bread baking craze of the pandemic has been around since last year, but because I'm a little slower on the uptake (and a backlog of other recipes to explore), I've only been able to get around to baking my own loaves of bread now. There have been batches of terrific cinnamon rolls, courtesy of King Arthur, and an English brioche-like loaf from Paul Hollywood, but this marks my journey into the world of crusty bread loaves that I adore.       

This recipe is the first crusty bread that I'd ever made, and is a success from the first go. The steps are pretty simple to follow, there are no special ingredients. As the name suggests, you just have to mix the ingredients together, and no need to knead. 

The dough has a long downtime. As the dough develops over the course of a week, each step is spaced apart by days. This is a feature and not a bug! It’s great for the days when everybody is stuffed to the brim, but you still have the itch to do something with your hands. Between each long downtime, you can bring it out and work on it a little, then pop it into the fridge at your convenience and let it flourish.   


No-Knead Bread
Adapted from Kenji López-Alt's Better No-Knead Bread, with additional steps taken from his video
Makes 1 small loaf of bread

INGREDIENTS

300g bread flour or all-purpose flour
4.5g (about 3/4 teaspoon) salt
3g (about 1/2 teaspoon) active dry yeast
210g water

STEPS

Whisk flour, salt, and yeast in a large bowl until well-mixed. Add water and combine the ingredients with a spatula until no areas of dry flour remains. Cover the bowl with a lid and let rest at room temperature for between 12 to 24 hours. The dough will rise over the day and double in volume, so choose a large bowl with adequate volume. 

Place the large bowl in the refrigerator, and let rest for at least 3 days (and up to 5 days). The dough might deflate from its time in the fridge. The long resting period allows the gluten to develop, and is not meant for the dough to continue rising further.    

Turn out the dough onto a well-floured surface, such as a large cutting board or a clean table. Turn it once or twice and shape it into a round loaf. Line a large bowl with a well-floured kitchen towel and nest the dough inside. Cover the bowl with a metal tray (you will be turning out the dough straight onto the metal tray and baking directly on it after). Rest it at room temperature for at least 2 hours, and up to 4 hours. 

About 30-45 minutes before you want to bake the bread, preheat oven to 230°C with a rack set in the lower middle position.

When you're ready to bake, turn out the dough onto the metal tray. Coat the blade of a knife with flour and slash the top of the dough about two to three times, 1/2 inch deep each. Set the dough with the metal tray into the oven. Lightly wet a large oven-proof bowl that can fit over the dough (Essentially, you just pour a bit of water into the large bowl, swirl the water around to coat the sides of the bowl and then pour excess water out. You can see the process here - skip to 20:00 minute.) Then set the bowl upside down to cover the dough in the oven.

Bake for 15 minutes with the bowl on, then remove the bowl from the oven and continue to bake for about 20-30 minutes more, until the top and bottom is crisp and well-browned. Remove the bread from the oven. Rest on a wire rack for about 15 minutes before slicing and serving. 

Storing
Excess bread can be wrapped in foil and stored at room temperature for up to three days. Lightly toast in a hot oven or toaster before serving.

14 September 2021

Sally Lunn Buns - A Posh (TM) English Teacake Recipe

September 14, 2021 0
 Sally Lunn Buns - A Posh (TM) English Teacake Recipe

A Sally Lunn bun first struck me with its whimsical name. Exactly what is this bread that everybody has been low-key making over and over again? And how can I get my mittens on one? 

Well, it's a bread with a great-looking exterior, that's for sure. A deep golden brown crust, shiny from a milk glaze. It's soft and yields easily to a bread knife. The bread interior is fine-crumbed and lightly yellow, gorgeous with a daub of clotted cream or a smear of jam.  

This teacake dates back to the 17th century, and attributed to a Huguenot refugee called Solange Luyon who settled in Bath and brought this sweet yeast bun to the region. The English language butchered her name into "Sally Lunn", and 400 years later, here we are (or so the legend goes.) Others offer up another version of the teacake's origin: it was originally known as "soleil et lune" ("sun and moon" in French, representing its golden crust and white interior). . A similar amount of butchering of the French words over 400 years, (I'm sensing a common theme here), voilà, it's now known as Sally Lunn. I'll leave the origins debate to the experts, while I focus on what I do best: snacking. 


Sally Lunn Buns
Original Recipe from Paul Hollywood's British Baking
Makes 1 loaf
As good as each slice tastes, cut straight from the loaf while still 
warm from the oven, I find them even better when sliced and lightly toasted.   

INGREDIENTS
275g bread flour
1 tsp salt
2 tsp granulated sugar
7g sachet dried, instant yeast
30g unsalted butter, softened
1 large egg, beaten
100-120ml milk
To Glaze: 2 tsp sugar mixed with 2 tsp milk

STEPS

In a large bowl, add flour. Add salt and sugar on one side and the yeast on the other. Make a little well in the middle of the dry ingredients, and add the butter, egg and about 2/3 of the milk. Using your hand, combine the wet ingredients with the dry ingredients in a circular manner, all the flour has been incorporated. Continue to drizzle in a little more milk at a time, until the dough becomes be soft and sticky (You might not need all of the milk.)

In the same bowl, continue to knead the dough for about 5-10 minutes; it will be progressively less sticky, and more cohesive and smooth with kneading. Then place the dough into a large, lightly oiled bowl. Cover and let rise for about 2-3 hours.

Lightly butter a deep cake pan, and tip the dough into it. Push the dough around a bit and fold the dough in on itself until the skin of the dough is taut and vaguely round in shape (no need to be obsessive). Leave the dough to rise for about an hour, until about doubled in size.  

Preheat an oven to 200C/180Fan/Gas6. In a rack set to the lower 1/3 of the oven, bake for 15-20 minutes until risen and golden brown on the top. 

Brush the top and sides with the glaze as soon as it comes out of the oven. Transfer to a wire rack to cool slightly. It could be sliced and served warm as is, or individual slices can be lightly toasted prior to serving, until each slice has a slightly crisp exterior.   


20 June 2021

Samin Buttermilk Roast Chicken

June 20, 2021 0
Samin Buttermilk Roast Chicken

I'm still trying to work out how it all started, but I've developed an obsession with using milk in my roasted meats. It all started when I read of Maiale al Latte, or milk-braised pork, an old Italian tradition that slow-cooks pork shoulder in milk, resulting in a tender hunk of pork swimming in a pool of creamy, almost-caramelised milk. 

In a similar vein, I find myself enamoured with Samin Nosrat's way of roasting chicken, which uses buttermilk. The chicken soaks in the buttermilk overnight like a delicious spa, and the 
lactic acid in buttermilk works on the chicken meat. The resulting chicken? Perfectly-done and juicy, where the chicken breast is as supple as the thigh, and with a nice crackling skin.

I've been roasting chickens for years with mixed success. Like a rube, I first started by 
just plonking a chicken straight into an oven and letting it cook, which turned out not great at all. I wizened up a little since then, and tried several ways of achieving roast chicken, from first boiling the chicken in seasoned chicken broth before transferring it into an oven (thanks Red Spice Road!), to spatchcocking (as recommended by Serious Eats). But this buttermilk process beats every other recipe hands-down for taste and convenience. It even adapts well to Christmas turkeys as seen below, though I could have left the turkey in the oven to brown for a bit longer. Also, I clearly could use some more carving practice

Samin Buttermilk Roast Chicken
The chicken should be marinated 24 hours prior to roasting. This is incredible with buttermilk. A milk/vinegar mixture doesn't have the lactic acid to adequately tenderise the meat as much as buttermilk, though when I'd tried it, the roasted chicken was still much better than one roasted without marination.  

INGREDIENTS
1.5 kg chicken
Salt
1 cup (240 ml) buttermilk

STEPS
One day before roasting the chicken, season the chicken with salt and leave it for 30 minutes. For a 1.5kg chicken, about two teaspoons of fine sea salt would suffice. The wingtips can be removed and reserved to make chicken stock. 

Stir 1 teaspoon of salt into the buttermilk. Transfer the chicken in a large ziplock bag, and pour in the buttermilk. Squeeze out as much air as you can, then seal the ziplock bag. Place the ziplock bag into a tray in case of leakage, and refrigerate for 24 hours. If you like, you can turn the bag every so often so every part of the chicken gets marinated, but that’s not necessary.

An hour before you like to roast the chicken, remove the chicken from the fridge. Preheat the oven to 220°C, with a rack set in the center position. Remove the chicken and scrap off the buttermilk. Place the chicken on a shallow roasting pan, breast side up, and place in the oven, with the thighs and legs oriented to the back half of the oven. When the chicken starts to brown, about 20 minutes, reduce the heat to 200°C and continue for another 30-40 mins, until the chicken is well browned and the juices run clear when you insert a knife down to the bone between the leg and the thigh.

Let the chicken rest for 10 minutes before carving and serving.

Tip: Making chicken stock
If 99% of internet recipes are to be believed, making chicken stock sounds like a tedious and expensive process. Well, it doesn't have to be, and you can put that fennel right down. Making chicken stock is a great way to get the last bit of flavour from the roasted chicken after you're done with the meal, and no, you don't need a bag of chopped carrots either. In the can-do spirit of this article, written by a cookbook coauthor and as someone who has things to do aside from cooking, all you need is a chicken carcass and a pot of water, where you boil the chicken for the time it takes for you [to watch an episode of Succession].