Chik's Crib

18 February 2022

Royal Carribean's 4D3N Quantum of the Seas: Sea you there!

February 18, 2022 0
Royal Carribean's 4D3N Quantum of the Seas: Sea you there!

A friend in our line of work once said: work, rest or play - we get to choose two out of three. I might be a little slower on the uptake, because ever since I started working, I certainly felt that I haven't been playing or resting enough. Work had been especially demanding in the last couple of years, and I’ve been trying to catch up on some much needed zzz in my off time. When my stars aligned and a sympathetic administrator cut me some slack and approved a whole week of annual leave, it’s nice to take a break and sail away from everyday life.

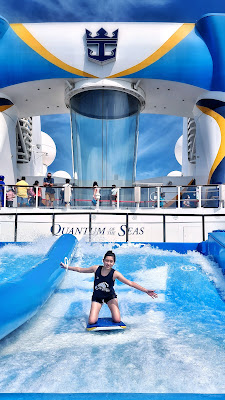
Boarding Royal Carribean’s Quantum of the Seas marked my first voyage on a cruise. This is a cruise to nowhere, one of those cruises with no ports of call. I didn’t think we missed out on much; I had perfected the art of lounging around at home, and I did just fine doing much of the same on the cruise. Of course, the cruise came with better distractions: water sports, top-notch food and all-round excellent service. 


Sailing in pandemic times is always a gamble, because the changing situation may pull the rug out from under our feet at any time. We’re past the second year of the pandemic, and cruises have been back in operation since Nov 2020. The initial trips hadn't been smooth-sailing, and I had read that in the initial reopening phrase, dining areas were shut and food had to be brought back to your rooms for consumption. But since then, the intervening months allowed cruises to iron out the wrinkles in their operation. Cruises still run at 50% passenger capacity, though in-restaurant dining had been restored and pre-board testing have been simplified and loosened up. 

As we set off on a Monday morning, the ongoing pandemic and the overcast skies couldn’t quite dampen our spirits. Walking up from the harbour to the cruise ship gave us our first look at it. It's huge! The Quantum of the Sea is a behemoth containing multiple swimming pools, rock climbing walls, theatres and pubs within its ecosystem. Maritime travels have come a long way indeed. Where once sailors chewed on stale tack under creaking wooden decks, we now come on board ships to experience luxury and refinement. Boarding was a cinch with the reduced amount of travellers: there was no queue, and we breezed past customs. Our room was clean and comfortable. Best of all, it came with a private balcony with an unfettered view of the ocean. 


Wandering along the upper decks brought us to the pool. Or should I say, pools. There are several open air pools on deck. In the covered (and climate controlled) indoors section, there was a cascading series of pools. Hot tubs are present in both the indoors and outdoors section, and we spent our mornings bouncing from hot tubs to pools to poolside chairs where I caught up on some much-needed tanning. Every hour is cocktail hour at the poolside bar, and other cruise-goers were sitting around with a drink in hand - or three. An especially popular water activity nearby was the Flow Rider. It’s as hard as it looked. I could get up to my knees, but standing on the board was too much for me and I wiped out a few times quite spectacularly in the ten or so minutes. 


Many dry activities are spread out across the ship. The Seaplex has an arcade. Aside from the usual games, it is also home to Bumper cars. We also gave rock climbing a go, although amongst the milling crowd, the number of spectators outnumber the participants. The gym is pretty well-equipped, though I prefer to work off the meals at the open air the running track on the deck. Running under the stars in the cool night air is quite pleasant, and as the ship powers through the ocean at night, you get a constant stiff wind blowing front to back of the ship.


Once on board, our days were filled with a godly amount of food. The fun part about cruises is to relinquish all thoughts of meal prep, and let a professional take the wheel. A lot of effort had gone into preparing food for the thousand-odd people on the Quantum of the Seas, and it showed. The meals were spectacular, even the basic ticket-inclusive meals at the Main Dining Room (which was really anything but basic). Every meal is an elaborate affair, with lunches and dinners being three-course sittings. Not that you had to limit yourselves to just three courses per meal: you could try all the dishes you like! The menu changes daily, and some dishes only may appear for one meal. (Sometimes to my chagrin, because holy sh*t, some dishes were fabulous, and I wouldn’t have mind eating again. The Steak Diane, for example, which I practically inhaled. And their delectable Crispy Coconut Shrimps.) The first nights’ menu was especially spectacular, with escargots and aged prime ribs on the menu. (I didn’t try ordering two prime ribs. I don’t think they’ll refuse, but my stomach may pitch a revolt.) For people who likes their meals a bit more casual, there’s also a concurrent buffet line running in the Windjammer Marketplace (also ticket-inclusive). Because I'm one of those who can't eat very much in one sitting but will happily snack throughout the day, I like eating at the Main Dining Room, and then popping by the buffet line to grab some fruits and cheese back to our room for supper, where we sit on the balcony overlooking the sea. The fridge in our room makes it ideal for storing beverages as well as buffet stowaways:) 


Aside from takeaway food, there were also several complimentary snacking venues available throughout the day, so you'll never have to worry about going hungry. Try as we might, I couldn't quite manage to eat every fancy sausage from the Seaplex Dog House, nor every pizza flavour from Sorrento’s. And I’m ashamed to say, we didn’t try most of the cakes, pies and sandwiches from Cafe Promenade


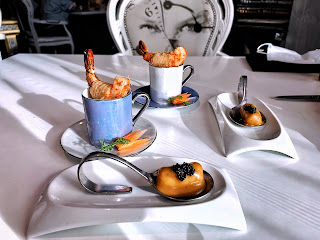
There were several other restaurants and pubs as well as a coffee house that were not ticket-inclusive. We were satisfied with the regular meals and snacking options, though we splurged for Wonderland, a molecular gastronomy restaurant. The setting and menu is based on Alice in Wonderland, and the meal was delightfully 
whimsical. The menu was a framed blank paper, and the words were revealed when you paint the paper over with a paintbrush. The ambiance and the playful display of each course made it a meal to savour. 


My days on board revolved around live acts, meal times and water activities. Scheduled entertainment run at regular intervals. Music performances range from solo guitarists in a cozy bar to an entire orchestra in the amphitheater. We saw a cabaret show, a juggling show, and my personal favourite, the acrobatic act done by the talented Revazov couple. The acrobatic show was so spectacular, I could’ve watched them every night. 


At the time when we bought the cruise tickets, four days seemed like the right duration. But on the fourth day after breakfast, I really didn't want to depart the ship, and wished we had gotten a longer duration. Barring the ploy to hide on the ship for round 2 while everybody else alights (which really wouldn't work too great for you), I guess we just have to book another trip, and soon. 


Tips for the Cruise  

Bring USD: It is easy to overlook that Royal Carribean is from the US. Its economy runs on the USD. The pubs and restaurants on board, the duty-free shopping and the gratuity (USD $10/pax/day) are charged in USD. If you're not from the US, have a think about which credit card you would like to use to pay with at the end of the trip, so you won't be scrambling on the last night. (A Youtrip card/app works well, which I brought along with me. I had some USD stored in the card back from my trip to LA). If you’re not from the US, you will also need a multiplug adapter for your devices. 


The Royal Carribean App: Get it. You check-in via the app. Once on the ship, seats for activities and shows are reserved via the app. It also tells you the menu for every meal throughout the cruise. Checking in was a little buggy on my iphone, but using my partner's Android, I was able to complete my check-in. 


Shows and Activities: Once we got aboard and linked up to the ship’s wifi, we could make reservations to shows and activities. Try to make your reservations soon upon boarding, as tickets do run out. (However, do also rock up early before the show starts if you would like better seats, as these shows are free-seating.) Bookings for popular activities such as the Flowrider or Rock Climbing Under The Stars are released in intervals at certain timings. You should speak with Guest Services for release timings and check the app at regular intervals for new reservation slots which do pop up time and again. 


Cruise packages: There are packages for alcoholic drinks, internet access or specialty restaurants. You will typically get an email for such discounted prices a few days before the cruise starts, and that’s when you should sign up if you’re keen. Connecting to the free wifi powers only the app. To get internet access, you’ll have to purchase their data package (as below). AirSIM is a company that I usually use for data services when travelling overseas, though I left it behind for the cruise. As this ship oscillates between the coast of Malaysia and Indonesia, providers such as AirSIM may not work. 


Meals: The ticket-inclusive meals blew me away with its quality, and echoing other guests, the food is especially more luxurious on our first day and last day. You will have a great time without going to other specialty restaurants, though if you are still keen to do so, I suggest booking specialty restaurants on mid-cruise days. 


AmenitiesI was pleasantly surprised. Our room is not luxurious, but perfectly clean, and spacious enough for the two of us. A 2-in-1 shower gel is provided but you may prefer to bring your own. While two 500ml water bottles are provided for drinking, we went ahead and brought our water bottles. Water coolers are down because of the pandemic restrictions, but after each meal, our servers are kind enough to fill our bottles for us. 


The private balcony attached to our room was a godsend. We didn’t quite realise how good it would be until we got on the ship. In this ongoing pandemic, it was our personal space to relax with a glass of wine while watching the sea waves and feeling the breeze on our face. We ate platters of cheese and fruits, and hot dogs and pizzas. Even desserts like profiteroles and tiramisu from the dining room and buffet line made their way into our balcony.  We spent an inordinate amount of lounging in our balcony, compared to the amount of time we spent in the common areas on the ship that are overlooking the sea.


There is a TV, but we had no luck playing our own entertainment from our phones or computer. A lot of finesse was required to get our HDMI cable into the TV port, but even after, the software running on the TV prevented  our personal devices from playing on the screen. It was initially possible using an Android phone connected to the TV via a USB-C cable, but the quality was poor and the movie was laggy. But perhaps we shouldn't be watching streaming services on a cruise anyway? There's plenty more things to do, even if it's just getting a sun-tan on our balcony. 

28 November 2021

Fresh Ginger Milk Pudding "姜汁撞奶" Recipe

November 28, 2021 0
Fresh Ginger Milk Pudding "姜汁撞奶" Recipe


As part of my quest to learn more about traditional desserts, I found this cute little recipe. It's a Cantonese dessert that's not very commonly found, and I don't think I'd seen one before this. It's a quivering bowl of milk pudding, made via an interaction between an enzyme found in ginger, which breaks down and reshapes milk proteins into a more solid texture.  

This is one of those recipes where measuring in volume is better than by weight. It's probably an unpopular opinion, given the current trend of measuring everything in the metric system. But some of ingredients are in minute amounts, so unless you own a precise jeweler scale or the likes, you're probably also better off using a teaspoon for measurement.   

Another point of contention for such an easy recipe: I'm going to be a contrarian and say I prefer using low-fat than full-cream milk. I'd tried using both, and I found full-fat milk too creamy, which distracts away from the sharpness of ginger. 

Fresh Ginger Milk Pudding "姜汁撞奶"
Original Recipe from Red House Spice 

INGREDIENTS

1 tbsp ginger juice (15g ginger would yield about 1 tbsp of juice)
200ml (1 cup) low-fat milk
8g (2tsp) granulated sugar

STEPS 

Peel the ginger. Using the most abrasive side of a box grater, grate the ginger as finely as you can. Grating whole ginger is preferable to using small pieces of ginger, to avoid any grating mishaps. Set a fine sieve over a bowl, and press the grated ginger through the sieve to collect the ginger juice.  

Portion 1 tablespoon of ginger juice in a bowl. Set the bowl aside. 

In a small saucepan set over medium heat, combine milk and sugar. Stir occasionally, keeping a close eye on the milk. When the milk reaches 70°C, remove the pan from the heat (as a rough guide, condensation from the cold milk by the sides of the pot would have fully evaporated around 60C, so that's when you should start using your thermometer.)

Pour the warmed milk into the bowl containing ginger juice. Without stirring, leave the mixture to set in the bowl, about 10 minutes. Serve warm.     

04 October 2021

Chinese Sesame-Soy Dumpling Sauce

October 04, 2021 0
Chinese Sesame-Soy Dumpling Sauce

I had always thought of condiments as a mere accessory to dumplings (just splash some black rice vinegar at the dumplings, amirite?), but my recent dish obsession called 红油抄手 (Sichuan red oil dumplings) have changed my mind.

红油抄手 is a commonly found dish to be honest, and New Shanghai in Melbourne makes a particular terrific version with peanut butter (!) that I'm still thinking about years later. But recent cravings caused me to spend the better part of a month fervently mixing up vinegar, soy sauce and chili in different proportions to get the most flavour out of them. 


I found a good dipping sauce elevates an ordinary dish of dumplings into an outstanding meal. This recipe from The Woks of Life knocks it out of the park. I've tried this sauce in different ways: once to dip for fried dumplings; the other, once as sauce for boiled dumplings (红油抄手). Both are equally excellent.   


Dumpling Sauce

Original Recipe from The Woks of Life
For about a dozen dumplings

I've adjusted to the sauce to my taste, and bumped down the saltiness. I've kept all the ingredients listed in a single unit, which simplifies scaling up/down as required. If you think need a bit more sauce, use a slightly larger spoon, or a tablespoon, a serving spoon, or even a small cup. 

INGREDIENTS
1 teaspoon minced garlic (about 1-2 cloves) 
1 teaspoon sugar
3 teaspoon hot water
4 teaspoon soy sauce 
1 teaspoon black rice vinegar
1 teaspoon chili flakes steeped in chili oil, such as 老干妈 Lao Gan Ma
½ teaspoon sesame oil
1 teaspoon sesame seeds, toasted 

STEPS

Mince garlic. Set aside. 

In a bowl, combine sugar with hot water until well dissolved. Add garlic and the rest of the ingredients (excluding the sesame seed) and stir to combine. 

In a small saucepan set over low heat, lightly toast sesame seeds, about half a minute. Just before serving, stir the sesame seeds into the soy mixture. Serve alongside the dumplings. 

26 September 2021

Kenji López-Alt's Better No-Knead Bread Recipe

September 26, 2021 0
Kenji López-Alt's Better No-Knead Bread Recipe

Warning: this bread will make you take a video, so you can record yourself cutting into the crunchy blistered crust.

The bread baking craze of the pandemic has been around since last year, but because I'm a little slower on the uptake (and a backlog of other recipes to explore), I've only been able to get around to baking my own loaves of bread now. There have been batches of terrific cinnamon rolls, courtesy of King Arthur, and an English brioche-like loaf from Paul Hollywood, but this marks my journey into the world of crusty bread loaves that I adore.       

This recipe is the first crusty bread that I'd ever made, and is a success from the first go. The steps are pretty simple to follow, there are no special ingredients. As the name suggests, you just have to mix the ingredients together, and no need to knead. 

The dough has a long downtime. As the dough develops over the course of a week, each step is spaced apart by days. This is a feature and not a bug! It’s great for the days when everybody is stuffed to the brim, but you still have the itch to do something with your hands. Between each long downtime, you can bring it out and work on it a little, then pop it into the fridge at your convenience and let it flourish.   


No-Knead Bread
Adapted from Kenji López-Alt's Better No-Knead Bread, with additional steps taken from his video
Makes 1 small loaf of bread

INGREDIENTS

300g bread flour or all-purpose flour
4.5g (about 3/4 teaspoon) salt
3g (about 1/2 teaspoon) active dry yeast
210g water

STEPS

Whisk flour, salt, and yeast in a large bowl until well-mixed. Add water and combine the ingredients with a spatula until no areas of dry flour remains. Cover the bowl with a lid and let rest at room temperature for between 12 to 24 hours. The dough will rise over the day and double in volume, so choose a large bowl with adequate volume. 

Place the large bowl in the refrigerator, and let rest for at least 3 days (and up to 5 days). The dough might deflate from its time in the fridge. The long resting period allows the gluten to develop, and is not meant for the dough to continue rising further.    

Turn out the dough onto a well-floured surface, such as a large cutting board or a clean table. Turn it once or twice and shape it into a round loaf. Line a large bowl with a well-floured kitchen towel and nest the dough inside. Cover the bowl with a metal tray (you will be turning out the dough straight onto the metal tray and baking directly on it after). Rest it at room temperature for at least 2 hours, and up to 4 hours. 

About 30-45 minutes before you want to bake the bread, preheat oven to 230°C with a rack set in the lower middle position.

When you're ready to bake, turn out the dough onto the metal tray. Coat the blade of a knife with flour and slash the top of the dough about two to three times, 1/2 inch deep each. Set the dough with the metal tray into the oven. Lightly wet a large oven-proof bowl that can fit over the dough (Essentially, you just pour a bit of water into the large bowl, swirl the water around to coat the sides of the bowl and then pour excess water out. You can see the process here - skip to 20:00 minute.) Then set the bowl upside down to cover the dough in the oven.

Bake for 15 minutes with the bowl on, then remove the bowl from the oven and continue to bake for about 20-30 minutes more, until the top and bottom is crisp and well-browned. Remove the bread from the oven. Rest on a wire rack for about 15 minutes before slicing and serving. 

Storing
Excess bread can be wrapped in foil and stored at room temperature for up to three days. Lightly toast in a hot oven or toaster before serving.

14 September 2021

Sally Lunn Buns - A Posh (TM) English Teacake Recipe

September 14, 2021 0
 Sally Lunn Buns - A Posh (TM) English Teacake Recipe

A Sally Lunn bun first struck me with its whimsical name. Exactly what is this bread that everybody has been low-key making over and over again? And how can I get my mittens on one? 

Well, it's a bread with a great-looking exterior, that's for sure. A deep golden brown crust, shiny from a milk glaze. It's soft and yields easily to a bread knife. The bread interior is fine-crumbed and lightly yellow, gorgeous with a daub of clotted cream or a smear of jam.  

This teacake dates back to the 17th century, and attributed to a Huguenot refugee called Solange Luyon who settled in Bath and brought this sweet yeast bun to the region. The English language butchered her name into "Sally Lunn", and 400 years later, here we are (or so the legend goes.) Others offer up another version of the teacake's origin: it was originally known as "soleil et lune" ("sun and moon" in French, representing its golden crust and white interior). . A similar amount of butchering of the French words over 400 years, (I'm sensing a common theme here), voilà, it's now known as Sally Lunn. I'll leave the origins debate to the experts, while I focus on what I do best: snacking. 


Sally Lunn Buns
Original Recipe from Paul Hollywood's British Baking
Makes 1 loaf
As good as each slice tastes, cut straight from the loaf while still 
warm from the oven, I find them even better when sliced and lightly toasted.   

INGREDIENTS
275g bread flour
1 tsp salt
2 tsp granulated sugar
7g sachet dried, instant yeast
30g unsalted butter, softened
1 large egg, beaten
100-120ml milk
To Glaze: 2 tsp sugar mixed with 2 tsp milk

STEPS

In a large bowl, add flour. Add salt and sugar on one side and the yeast on the other. Make a little well in the middle of the dry ingredients, and add the butter, egg and about 2/3 of the milk. Using your hand, combine the wet ingredients with the dry ingredients in a circular manner, all the flour has been incorporated. Continue to drizzle in a little more milk at a time, until the dough becomes be soft and sticky (You might not need all of the milk.)

In the same bowl, continue to knead the dough for about 5-10 minutes; it will be progressively less sticky, and more cohesive and smooth with kneading. Then place the dough into a large, lightly oiled bowl. Cover and let rise for about 2-3 hours.

Lightly butter a deep cake pan, and tip the dough into it. Push the dough around a bit and fold the dough in on itself until the skin of the dough is taut and vaguely round in shape (no need to be obsessive). Leave the dough to rise for about an hour, until about doubled in size.  

Preheat an oven to 200C/180Fan/Gas6. In a rack set to the lower 1/3 of the oven, bake for 15-20 minutes until risen and golden brown on the top. 

Brush the top and sides with the glaze as soon as it comes out of the oven. Transfer to a wire rack to cool slightly. It could be sliced and served warm as is, or individual slices can be lightly toasted prior to serving, until each slice has a slightly crisp exterior.