Chik's Crib

29 July 2023

Tomato-Based Broth for Hot Pot

July 29, 2023 0
Tomato-Based Broth for Hot Pot

Like most things, this started serendipitously. We blended up some tomatoes for an impromptu hotpot, and because my dad opened a couple of cans of abalone, I poured the abalone brine into the hotpot, which made this hotpot broth into something quite incredible. 

We can't always be eating abalone, but the good news is it tastes really good with chicken broth too. When I visited the US in October last year, I brought back with me several jars of Better than Bouillon, which I wrapped up as carefully as a newborn for the flight back to Singapore. And adding the chicken base to the tomatoes made a dramatic difference to the hotpot. I got all fancy at one stage, adding tomato paste and fish sauce, but as it turned out, the simple version is sometimes the best version. 

Tomato-Based Broth for Hot Pot  
Makes 6-8 servings

INGREDIENTS
9 tomatoes, quartered
3 tablespoons of Better Than Bouillon Chicken Stock

STEPS
1) In a blender, blend the tomatoes into a puree. Transfer to a large pot and add water to thin it out. 

2) Add chicken broth and stir to combine. Allow to come up to a boil over a stove, and then transfer to a portable stove for the hotpot. 

22 July 2023

Taiwanese Beef Noodles Soup Recipe

July 22, 2023 0
Taiwanese Beef Noodles Soup Recipe

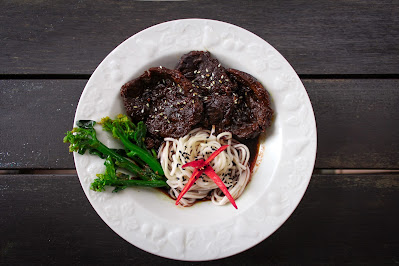
It’s been a busy few weeks that I'd spent studying, and I barely left the house. It's also the flu season, and I’ve been wrestling with back-to-back colds. I was craving something rich, soupy and warm, and more importantly, something to distract me from my impending examinations. Beef shins appear only sporadically in my area, and so when they appeared one day behind the grocer’s meat section, I bought back several hunks. Both ends of the beef shins have this off-white structure, just like a piece of shin bone running through but is slightly rubbery in nature, until I figured out that must’ve been the tendon. 

This Asian recipe is quite interesting. The usual way (that I had thought) of making beef broth would have been to first sear the beef, and then deglazing and scraping up the fond before letting the beef simmer in the oven. And of course, the obligatory tablespoon of tomato paste. But to prove the old adage that there's no one single way to success, I followed the recipe to the recipe. and made as it was, was utterly delicious. I was blown away by how it tasted. 

A recipe for hot sunny days, cold rainy days, and every day in between. 


Taiwanese Beef Noodles Soup 

Adapted from Tasty's Taiwanese Beef Noodles

Makes 6 servings


INGREDIENTS

Boiling water, about 6L, or more as needed

1kg beef shank

6 scallions, halved crosswise, divided

8 slices fresh ginger, divided

6 pods star anise, divided

½ cup vegetable oil(120 g)

6 cloves garlic

2 red chiles, halved lengthwise

1 medium white onion, sliced

1 piece rock sugar

3 tablespoons spicy bean paste, or regular bean paste

½ cup dark soy sauce(120 mL)

½ cup rice wine(120 mL)

½ cup light soy sauce(120 mL)

2 medium tomatoes, quartered

1 teaspoon white pepper

1 teaspoon salt

dried bay leaf

2 bundles flour noodle

50g bok choy

scallion, sliced, for garnish

fresh cilantro, chopped, for garnish

red chile, for garnish

Black and White Sesame seeds, for garnish


STEPS

1. In a large pot, add the beef shank, 3 scallions, 5 slices of ginger, and 3 star anise pods. Fill the large pot with enough boiling water to submerge the beef shank, about 5-6L of water. Cover and let boil for about 5 minutes over high heat. Boiling the beef remove the scum, while the spices remove the gamey-ness of the beef. 


 2. Remove the meat from the pot, and submerge it in cold water. Discard the cooking liquid. Cut the meat into thick medallions, about 3/4 of an inch thick. Set aside. 


3. In a wok or large pan set over medium-high heat, add the vegetable oil, the remaining 3 scallions, 3 ginger slices, the garlic, red chiles, remaining 3 star anise pods, the onion, rock sugar, and spicy bean paste. As the onions cook and start to turn translucent, add the sliced beef, the dark soy sauce, the rice wine, light soy sauce, and finally the tomatoes. Stir fry for 8-10 minutes.


4. Transfer the contents of the wok to the original large pot, and add water until the liquid covers the meat. Add white pepper, salt, and bay leaves, and allow the liquid to come up to a boil over medium-high heat. Then reduce the heat to a simmer, cover the pot and continue cooking for at least 2 hours, until the meat becomes tender. Remove the bay leaves and star anise before serving.


5. In a medium-sized pot, cook the flour noodles according to the package instructions. In a third pot, boil bok choy for 3 minutes, then remove.


6. To assemble the soup: place noodles into a bowl, then add the meat, vegetables and broth. Garnish and serve immediately.


22 May 2023

Hojicha Whisky Tiramisu Recipe

May 22, 2023 0
Hojicha Whisky Tiramisu Recipe


Koal in Singapore has a stellar reputation for their grilled food with Asian-inspired flavours. Its reputation is well-deserved. It was recommended to me on several occasions by Miss XS, and when I finally went, it did not disappoint. 

When desserts came about, I was blown away by their Hojicha Whisky Tiramisu. Three words that I never would have associated together, but it worked. It was earthy, it was rich, and it was perfection in a cup. 

I scoured the internet afterwards for a similar recipe, but couldn't find any desserts that combined both hojicha and whisky. Until I rolled up my sleeves, and decided to get to it myself. In my sixth month, and on my sixth iteration, I got it. 

One tip for making tiramisu, after all my tries, is to err on the side of choosing smaller vessels to hold the tiramisu. You want to avoid overestimating the amount of tiramisu that you can make, and end up with a flat, single-layered tiramisu, as it does not look or taste as appealing as a two-or three-layered one. If you truly have an excess, break out the dessert bowls to make single size portions, which always look good.

In this recipe, I took the controversial step of stipulating "3.6 eggs", and I look forward to the fan mails. The reason was that I scaled the recipe to a tub of mascarpone, which goes for 500g around these parts. The original recipe uses 5 eggs and 680g of mascarpone (both much more reasonable numbers) but I could never figure out what I was to do with the remaining mascarpone. So instead, I crack an egg, mix the egg white and yolk around and then spoon out a little less than half to store in a tupperware. It worked out really well so far. 

Hojicha Whisky Tiramisu
Tiramisu recipe adapted from Stella Parks
Inspired by Koal

You may notice measurements in both weight and tablespoons, which is a deliberate choice. I weigh sugar and mascarpone, but unless you have a jeweller's scale, you're going to have a high margin of error weighing hojicha powder. I use a standard US tablespoon for this recipe. The other benefit of using volumetric measurements is that it is easily scalable by using a larger or smaller spoon.

INGREDIENTS

2 tbsp hojicha powder, plus more to layer and top the tiramisu 
3 tbsp whisky
11 tbsp water  
500g mascarpone 
3.6 eggs
70g sugar
1/8 tsp salt
About 20 Ladyfingers

STEPS

1. In a rimmed plate wide enough to accommodate a full-length ladyfinger, combine hojicha powder, whisky and water. Set aside

2. In a tall metal saucepan, combine eggs, sugar, and salt with a spatula. The eggs are to be cooked in a water bath to minimise food-borne illnesses. Fill a large skillet with an inch of of water (leaving ample room for the metal saucepan to sit in the water without causing water spillage), and bring to a boil. Turn down the heat to medium, and place the saucepan into the waterbath. Allow the eggs to come to 160°F (71°C), scraping the bottom of the pan constantly to prevent the eggs from overcooking. This should take about 5 minutes; a lack of progress means you need to turn up the heat.

3. Remove the saucepan from the water bath, and strain the eggs (to sieve out any bits of curdled eggs) into a bowl set into an ice water bath. Let the egg mixture cool, until it's no longer warm to the touch.

4. Using either a handheld mixer or a stand mixer, whisk the eggs on high speed for 5 to 10 minutes, until they have more than quadrupled in volume and are thick enough to briefly hold its shape when dropped from the whisk. Reduce speed to medium and add mascarpone, about 1/4 cup at a time; no need to wait for the mascarpone to completely incorporate before adding more. Scrape down the sides and bottom of the bowl, and then continue whisking for a couple more seconds to break the big chunks of mascarpone down into smaller bits. The small flecks of mascarpone will smooth out on their own afterwards.

5. Assemble: Dunk each ladyfinger in the hojicha/whisky mix, giving it about 5 seconds to absorb the liquid, then place in the bottom of your bowl. Add a  layer of mascarpone filling (about 2cm in height), and then dust lightly with hojicha powder. Repeat with the ladyfingers, then the mascarpone and then a final coating of hojicha powder over the top. Cover and refrigerate overnight before serving.  

Storage for excess ladyfingers: Ladyfingers, once opened, should be kept in the fridge or frozen if you live in a humid climate.   

Variations: In lieu of Hojicha-Whisky, another winning combination is Bailey's Irish Cream and espresso, mixed in a 1:1 ratio.   


08 May 2023

Vietnamese-American Garlic Noodles Recipe

May 08, 2023 0
Vietnamese-American Garlic Noodles Recipe

Fish sauce may have just become my new favourite ingredient. Ever since I discovered this wonder-sauce in Vietnamese Caramelised Chicken, I've been adding it to just about everything I cook, from scrambled eggs to tomato soup (for hot pots). So far, there hadn't been a savoury dish that did not  benefit from a splash of fish sauce and its ensuing unami-bomb.

My latest favourite-est dish is this garlic noodles from the New York Times, which is adapted from San Francisco’s cult-darling restaurant Thanh Long. It's a fusion Aglio e Olio, one that had been glowed up with Vietnamese ingredients and featured a double-hit of unami from fish sauce and pecorino romano.

I’ve made this a few times over the year, and eventually came about to this final iteration. First up, I’ve dialed up the amount of Pecorino, because the original proportion was a little scanty for my taste. Second, I've sautéed the garlic with olive oil instead of butter. A neat trick for jazzing up spaghetti, one that I'd learnt from Carmelina in Boston, was topping each plate of spaghetti with pan-fried bread crumbs. Store-bought roast ducks also go perfectly well alongside these noodles. The version (pictured above, with the recipe below) is served with sliced mushrooms, fresh chives and fish roe, and is my preference when I could get my hands on fish roe. 

Vietnamese-American Garlic Noodles
Adapted from Kenji Lopez's article in the NYT: San Francisco-Style Vietnamese American Garlic Noodles 

INGREDIENTS
4 teaspoons oyster sauce
2 teaspoons light soy sauce 
2 teaspoons fish sauce
4 tablespoons of olive oil, plus more for sautéing mushrooms
20 medium garlic cloves, minced or smashed in a mortar and pestle
1 pound dry spaghetti
200g mushrooms, sliced
chili flakes for seasoning
150g Parmesan or Pecorino Romano, grated
A small handful of thinly sliced scallions 

STEPS
1. In a small bowl, combine oyster sauce, soy sauce and fish sauce. Set aside. 

2: Set a wok or a large skillet over low heat. Add olive oil and garlic, letting the garlic cook gently without browning (about 2 minutes). And as an exuberant Frenchman once said, to cook the garlic until its aroma can be smelled, and then then lock in the flavour by putting liquid. In this case, add the soy sauce mixture and remove from the heat. Stir to combine and set aside. 

3: In another large skillet, bring 1½ inches of water to a boil. Salt the water with a teaspoon of salt, and then add the pasta. Cook pasta to al dente; remove pasta from the saucepan 2 minutes before the recommended cook time on the pasta package. 

4. As the pasta is cooking, place a small skillet over medium heat. Add olive oil, then add sliced mushrooms and season with chili flakes. Cook until tender, then remove from heat and set aside.

5. When the pasta is ready, remove the pasta from the boiling water and add it to the saucepan containing the garlic sauce. (I use tongs, and any amount of pasta water that comes along with the noodles is welcomed. Don't toss the pasta water away!) 

6. Add cheese to the pasta, and stir vigorously until the sauce is combined and creamy. If the cheese starts to clump up, splash a bit more pasta water into the saucepan, which would help the emulsification process. Add in the cooked mushrooms and scallions (if using) and serve immediately.

16 April 2023

Seared Tuna with Sesame-Seed Crust Recipe

April 16, 2023 0
Seared Tuna with Sesame-Seed Crust Recipe


Ever since the summer of '19, where a
 younger and more impressionable version of myself had a seared tuna fillet in Santa Monica Oyster Bar in California, the dish had been living rent-free in my head. Yes, it's a dish which had its hey-day in the '90s, but in my defense, I wasn't born yet. Late is better than never, and thirty years down the road, I'm just discovering how good the classics can be.  

Because the tuna is served raw in the middle, it's worthwhile to find sashimi-grade tuna from a place that you trust. What complicates things is that the term 'sashimi-grade' is entirely unregulated, and any mishaps in the cold-chain, a term we are all familiar with after COVID, may run the risk of eating bad raw fish. Do get your sashimi from a reputable source.

Sesame-Crusted Seared Tuna 

INGREDIENTS
Tuna fillet, 
sashimi-grade, ideally about 1-inch thick

1/2 tsp salt 

Black and white sesame seeds

Olive oil

1/2 lemon


STEPS

1. Set a non-stick frying pan over high heat. Add olive oil. 

2. In a plate or large bowl, combine the sesame seeds. Salt the tuna fillets and coat the tuna with sesame seeds.  

3. Sear the flat side of the tuna over high heat for 45s on each flat side, and then a quick sear, about 10s on each of the remaining sides of the tuna's surface.  

4. Remove from heat immediately and slice the tuna with a sharp knife. 

5. Serve over a bed of salad, and squeeze the juice of half a lemon over the dish.