September 2019 - Chik's Crib

20 September 2019

Blueberry Ice Cream Recipe

September 20, 2019 0
Blueberry Ice Cream Recipe

I had always been a little leery of making fruit-based ice cream, as I have some trust issues with my ice-cream making capabilities. But also, bearing in mind the prices of berries from where I'm from, a nagging voice in my head keeps reminding me that berries are a little too pricey an ingredient to mess around. I'm a struggling newly grad, y'all. But now that I am currently on a break and visiting my sister in California, I'm making full use out of her ample fridge space, her ovens (plural), her full array of kitchen gizmo, and of course, all the agricultural produce blessed by the California sun. It's smack-dab in the berry season in September, where every grocery chain that we'd been to couldn't offload their boxes of strawberries, blueberries, blackberries and raspberries fast enough. And all these fresh dairy products supplied from within state lines? Simply gorgeous. Which, naturally, we took full advantage of. 

When everything was set and done, we found ourselves with two quarts of a brilliantly-coloured ice cream bursting with blueberry flavour. We managed to cook off excess water content during the process, resulting in an ice cream that was smooth and creamy.  


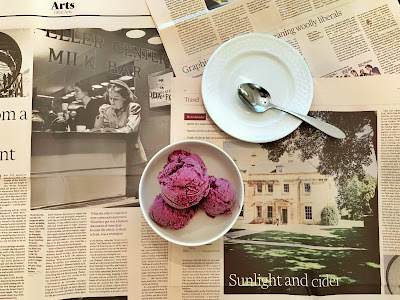
Best of all, I lucked out with the FT I'd been holding onto forever (which I'd snagged from my flight, and had been meaning to read), and its warm hue makes a perfect backdrop. Who says hoarding wouldn't pay off? 


Blueberry Ice Cream Recipe
Adapted from Food
Makes 1 quart
The original recipe makes 2 quarts (almost 2L), which my sister's ice cream machine could accommodate. I had scaled the recipe down to a more manageable single quart, which fits my ice cream machine back home. I hadn't tried Kirsch for myself, but I'd heard it can be paired with fruit-based ice cream instead of vodka. If using kirsch, keep the amount less than 1 tablespoon per litre of ice cream. 

INGREDIENTS
250g (2 cups) fresh blueberries
150g (3/4 cups) sugar
1 tablespoon water
1/2 tsp vanilla 
1/2 tsp cinnamon
360ml (1 1/2 cups) cream
120ml (1/2 cup) milk 
3 tbsp vodka

STEPS
1. In a large saucepan set over medium heat, combine blueberries, sugar and water. Let it come to a boil, and then turn the heat down to a slow simmer. (If using frozen berries, start off with low heat.) Let the mixture simmer for about 5-10 minutes, stirring constantly and squashing the blueberries as you do.  

2. Remove from heat and add vanilla and cinnamon. Stir well. Transfer to a table-top blender (or use a handheld blender). Blend the blueberry mixture well. 

4. Stir in cream, milk and vodka. Cover and refrigerate until well-chilled. 

5. Operate the ice cream machine according to the manufacture's directions.

08 September 2019

Matcha Cheesecake Recipe

September 08, 2019 0
Matcha Cheesecake Recipe

I started making this as a wee young lad back in 2013. I had made numerous tweaks here and there along the way, not all which are appreciated. Some, like layering the cheesecake with sweetened red bean paste, are smashingly successful, while others, like using honey cheerios and ground almonds in lieu of graham crackers, remain best forgotten. 

Layering the cheesecake with red bean paste is an optional step that requires an additional day of prepping ahead, but which is well worth it as it elevates this dessert's appearance - and taste - to something rather extraordinary. 

This cheesecake is a frequent favourite of my sister, for whom I'd make regularly whenever we visit. This year, as I had some vacation time, I jumped at the chance to experience summer in LA and spent a few weeks making the most out of her massive kitchen and her extensive range of kitchen appliances. It's also the peak season for summer fruits, and seeing the prices of cream cheese and other dairy products make my jaw dropped. So this is what acute jealousy feels like... 


Anko (Sweet Red Bean Paste) Recipe
Original recipe from Namiko Chen 
This makes enough to layer one cheesecake. Japanese red bean paste can be either chunky (Tsubuan) or fine (koshian). This recipe makes the chunky ones, and koshian is made by further straining tsubuan through a sieve. 

Ingredients
100g Azuki beans (Not all red beans get mushy, so if in doubt, buy the large ones which are labelled as Japanese Azuki beans) 
Water
80g granulated sugar
Pinch of salt 

Steps 
1) Soak the azuki beans in a bowl of water overnight, about 8 hours. 
2) Discard the water and rinse the azuki beans. Transfer the beans into a pot, and pour room temperature water into the pot until the water comes to about 1-2 inches above the beans. Let the water come to a boil, and then turn off the heat and cover the pot with a lid. Let stand for 5 minutes. 
3) Discard the water, and replace with fresh water; but this time, only pour just enough until the water covers the all the beans. Let the water come to a boil over high heat, then let simmer at a low-medium heat for at least an hour. Stir occasionally and continue to add water at regular intervals to replace water which has been boiled off. The beans are done when they are soft and can be squashed easily. 
4) Turn the heat to high, and add the granulated sugar in three portions, stirring after each addition. Let the mixture continue cooking and thickening, until a line drawn with your spatula exposes the bottom of the pot for 2 seconds. This would take roughly another 45 minutes for the azuki bean paste to thicken. When done, turn off the heat and add salt. Stir well and let the mixture cool. The paste will thicken further as it cools.
5) Let cool completely, and then transfer to a container and refrigerate until well-chilled. They can keep for a week in the fridge, or up to a month in the freezer. 

Cheesecake Base Recipe
Ingredients (for the base) 
250g graham biscuit
100g unsalted butter, melted

Steps (for the base)
1) Crush the graham biscuits with a food processor, or with a plastic bag and the flat end of a hammer (If you're low-tech like me). 
2) Place the crushed graham biscuits in a medium-sized bowl. Drizzle melted butter in and mix well. If the mixture remains dry and crumbly, add more melted butter until it just comes together. 
3) Line the bottom of a cake pan with baking paper. Spread the graham mixture over the base of the cheesecake and press and compact them. Place in the freezer and chill thoroughly. 
4) When the graham layer is completely hard and frozen, spread the azuki paste over the graham, leaving about an inch of azuki-free space along the circumference. Excess azuki paste can be kept in the fridge/freezer, or perhaps turned into koshian and smeared onto serving plates with a slice of cheesecake. 
5) Wrap the outside of the cake pan with aluminium foil to prevent water from the water bath from seeping in afterwards. Place in the freezer until ready to make the matcha filling. 

Matcha Filling Recipe
Original recipe from Allrecipe

Ingredients (for the matcha filling)
450g (2x 8 ounce) cream cheese, softened
125g white sugar 
2 eggs, beaten
2 teaspoon vanilla extract
1 heaping tablespoon matcha powder

Steps (for the matcha filling)
1) Preheat the oven to 175C (350F). 
2) Beat the cream cheese and sugar together on low power until smooth. Add the eggs, vanilla extract. Add in the matcha powder and fold the mixture together until homogenous.   
3) Set a sieve over the cake pan. Pour the matcha mixture through the sieve into the cake pan (over the graham layer and the azuki layer). Rap the cake pan on a towel set over a flat surface, so any air bubbles in the cheesecake mixture can escape. This prevents the cheesecake top from cracking. 
4) Place the cake pan in an oven tray and set a water bath (pour boiling water into the tray surrounding the cake pan.) Bake for about 30-35 minutes, until the sides are set but the centre still wobbles slightly. It is better to err on the side of underbaking, as the cheesecake would continue to cook as it cools. Turn off the oven but leave the cheesecake inside and crack the door of the oven slightly ajar to let the interior of the oven cool gradually. 
5) Chill thoroughly before serving, for at least an hour.