April 2021 - Chik's Crib

25 April 2021

Anne Burrell’s Braised Short Ribs Recipe

April 25, 2021 0
Anne Burrell’s Braised Short Ribs Recipe

Just as the COVID vaccine is rolling out across the general population, and restrictions on social gathering is (sorta) loosening up a little, I’ve taken the chance to get out of the house a little. I've had a week of respite from work, and filled my calendar with leisure and activities. 

I’ve bought some tennis balls, dusted off my racquet and am easing back into the game.  Tennis as a sport is probably as socially distanced as one can get, so I'm pretty safe. I’ve started jogging as well, and also (well, attempted to) play golf at a driving range, all activities suitable to keep people at a healthy arm’s length away. (Especially in golf, where me swinging metal clubs with impunity gets me a wide berth from other people.)

I've also taken to exploring Singapore for a bit. A trip to a local farm in the North-West farming regions of the country had netted me an ample pot of sweet basil, and baby plants of ladyfinger, eggplants, roselle and kale. I really don’t have a good record with young plants, but #8thtimelucky? 

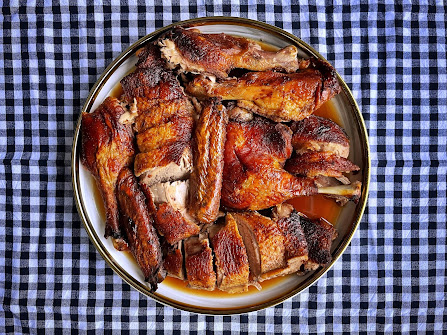
This week of respite from work also coincided with a grocery store’s sale on beef short ribs, and so I spent one morning carting several kilos of these beauts home. At the top of my to-do cook list is Anne Burrell’s Short Ribs, which was spectacular indeed.  

The first time I did this recipe, adding the marbled beef ribs to the hot pan filled the entire kitchen and living room with the fragrance of seared beef, which I didn't mind so much. But as I discovered, searing beef indoors also deposits a thin film of oil all over the kitchen and the floor of the living room. Oops. So now I’ve wisened up, and started using my outdoor stove, which also made adding bits of herbs from my garden into my pot a little easier.    


Anne Burrell’s Braised Short Ribs 
Adapted from the Food Network
Makes 3-4 servings
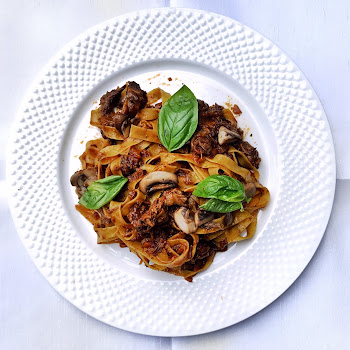
Short ribs yield much more tender meat than cheaper cuts like general packaged 'stew meat', and should be used for better results. I've used both bone-in and boneless, and both versions are delicious. As a general rule, One rib (bone-in) per person should be adequate alongside a side dish such as mashed potato, noodles or rice. There's plenty of downtime in this recipe, which I use to put together a quick mashed potato recipe from Gordon Ramsay. (I add one minced garlic to the milk/butter/cream component of the mashed potato recipe, which adds an additional depth of flavour to the potato.) Leftover meat can be deboned and tossed with its sauce and pasta the next day for a quick meal. 

INGREDIENTS

3 bone-in beef short ribs (about 1.3kg), cut into individual ribs
Kosher salt
Extra-virgin olive oil
1/2 large Spanish onion (if you can’t find Spanish onions, regular is fine)
1 rib celery
1 carrot, peeled
1 clove garlic, smashed
180ml (3/4 cup) tomato paste
1 - 1 1/2 cups red wine
About 2 cups water
1 small bunch of fresh thyme, tied with kitchen string
1 bay leaf

STEPS

Preheat the oven to 190C.

Season each short rib with salt and set aside as you prepare the rest of the ingredients. Cut the carrot, onion and celery into small pieces. Purée them with garlic in the food processor, until coarse paste is formed. If you don't feel like cleaning up a food processor after, I mince the vegetables as finely as I can manage instead.  

When ready, place a roasting tray or large pot over high heat, and add olive oil. When the olive oil is lightly smoking, add the short ribs to the pan. Do not overcrowd pan; cook in batches, if necessary. Brown each side of the beef rib very well, about 2 to 3 minutes per side, and then remove from pan. 

Drain the oil and scrap any burnt bits off the bottom of the pot. Return to high heat, and add more fresh olive oil to the bottom of the pot. Add the pureed vegetables and season with salt. If you have minced your vegetables instead of using a food processor, you may need to drizzle a couple of tablespoons of water in to help the vegetables soften more. Stir occasionally, scrapping the fond off the bottom of the pot, and cook until the vegetables are dark brown, about 5 to 7 minutes. Lower the heat if things start to burn. Add the tomato paste, and let brown for 4 to 5 minutes, scrapping off fond that develops. Add the wine and deglaze the bottom of the pot, and continue to cook until the mixture is reduced by half.

Return the short ribs to the pot and add water, until the water has just about covered the meat. Add thyme and bay leaf. Cover the pot and place in the preheated oven. Cook for 2 - 2.5 hours. Check periodically during the cooking process and add more water, if needed. Turn the ribs over halfway through the cooking time. In the last 20 minutes of cooking, remove the lid from the pot so the sauce can further reduce and get nicely browned. Remove from the oven when the meat is very tender but not falling apart. Serve with the braising liquid.

17 April 2021

Risotto With Crispy Mushrooms Recipe - A Risotto Cooked in the Oven

April 17, 2021 0
Risotto With Crispy Mushrooms Recipe - A Risotto Cooked in the Oven


I ambitiously bought several kilos of rice on a late-night grocery shopping spree last year, and filled my larder with bags of Japanese sushi rice, Arborio Rice and Calasparra Rice. I'm still getting around to the sushi rice, but I've been having a grand time exploring Italian and Spanish recipes. 

This recipe is one great find, and became an instant favourite. Most of the work is done in the oven. The mushrooms gradually crisp up in the oven over an hour, leaving you with ample time to leisurely dice the onions, grate the parmesan and indulge in a glass of pre-dinner wine. 

Risotto With Crispy Mushrooms Recipe 
If you're cooking for someone who enjoys a meal with a portion of protein on the side, seafood such as seared scallops, squid or prawns would be a welcome addition. 

Original Recipe from Epicurious
Makes 3-4 servings

INGREDIENTS

1 lb. mixed wild, shiitake, and/or crimini mushrooms, broken into pieces or sliced 1/4" thick (about 4 cups)
3 garlic cloves, peeled, thinly sliced
6 thyme sprigs
1/4 tsp. crushed red pepper flakes
1/4 cup plus 2 Tbsp. extra-virgin olive oil, plus more for drizzling
1/4 + 1/4 tsp fine salt
1 medium onion, finely chopped
1 cup arborio rice
1/2 tsp. freshly ground black pepper
1/2 cup dry vermouth or white wine
2.5 + 0.5 cups homemade chicken stock or low-sodium chicken broth
60g finely grated Parmesan 
2 Tbsp. cold unsalted butter, cut into pieces
1/2 tsp. finely grated lemon zest
1/3 cup coarsely chopped parsley leaves
Lemon wedges (for serving)

STEPS

1. Preheat oven to 175°C. Set a rack in bottom third of oven. 

2. Combine sliced mushrooms, garlic, thyme, red pepper flakes, 1/4 cup olive oil, and 1/4 tsp. salt on an unlined rimmed baking sheet. Roast on bottom rack for 45 minutes to an hour,  until the slices are deeply golden brown and crisped. As the mushrooms roast, they will release their water contents. After 10 minutes into roasting, any liquid can be removed (to reserve for cooking the risotto. About 30 minutes into roasting, scrape and toss the mushrooms to prevent burning. When the mushrooms are just about done, set the oven to broiler and place the tray of mushrooms in the top rack to crisp the sides up further. Remove from oven and let cool.

3. As the mushrooms are roasting, heat 2 tbsp. olive oil in a large ovenproof pot set over medium-high heat. Add onion and cook for about 3–5 minutes, stirring often, until softened and slightly translucent. Stir in rice; season with pepper and 1/2 tsp. salt. Cook, stirring occasionally, until some grains are translucent, about 2 minutes. Add vermouth to deglaze the pot. Stir, until most of the vermouth has evaporated, and then add the reserved mushroom juice. Add 2.5 cups stock (reserving 1/2 cup stock for afterwards). Allow the stock to come simmer, then cover with an ovenproof lid and transfer to the oven and continue cooking for about 15–18 minutes, until liquid is mostly absorbed but rice is still slightly firm in the center.

Return pot to medium heat on a stove. Add the remaining 1/2 cup stock stir constantly, until the rice is tender but still has some bite, about 2 minutes. Remove from heat and stir in Parmesan, butter, and lemon zest. Season to taste with salt, if needed. 

Portion the risotto into individual portions, top with crispy mushrooms, parsley and any protein. Serve immediately. Serve with lemon wedges alongside.

10 April 2021

Dumpling Wings Recipe

April 10, 2021 0
Dumpling Wings Recipe


Using equal parts cornflour/AP flour leads to thin, wafer-like and non-lattice structure (as compared to the lattice structure using tapioca starch - as below) 

Of all the recipes that I do, the ones that get revisited a lot more are those that can be served for breakfast, lunch, dinner or even as a between-meal snack. That means things that are things that are simple and fast (no slow roasts, and not platefuls of carbohydrate). An omelette is one such dish, as are Kimchi pancakes and dumplings. Today, I'll like to, if I can, to ponder over my love for dumplings. 

Of course, this isn't a recipe to make dumplings from scratch. This post is about a simple trick to get crispy thin "wings" attached to your pan-fried dumplings. Using frozen, store-bought dumplings are perfectly fine. Given that the technique was first developed in Tokyo in the 1980s, Japanese gyoza would be perfect for this, though I've seen Chinese restaurants employ this technique for their 饺子 (potstickers). I've gotten my dumplings from a store near my workplace in Jurong Gateway at 山东東记拉面小笼包 (the current rate is a bag of frozen dumplings at 30 for $10, and as you can see, these are huge and juicy!) My home non-stick skillet is 8-inch, though any size would work as long as the dumplings fit and there is a well-fitting lid.  

Pan-frying dumpling involves adding dumplings to a hot pan with a thin layer of oil until the bottom is browned, then adding water to the pan, covering it with a lid and steaming the dumplings well cooked on the inside. The trick to getting delicate crisp wings is adding half a tablespoon of tapioca starch to the water you use to steam the dumplings. As the water cooks off, the starch remains and forms the wings.

Tapioca starch

Dumpling Wings Recipe
Original recipe from J. Kenji López-Alt
I've tried this recipe with both gyoza and regular Chinese dumplings. The essence remains the same, though plumper dumplings (like the Chinese ones I've made with) will require a bit more water to completely cook the dumplings.  

INGREDIENTS

1-2 tbsp flavourless oil, such as canola oil 
Dumplings, fresh or frozen
80ml water 
1/2 tbsp tapioca flour
Black vinegar, with 
julienned ginger (cut into long thin strips) - optional

STEPS

1. Set a non-stick pan over medium-high heat. Add a thin layer of oil. 

2. When the oil gets hot, add dumplings. If using gyoza, you may choose to arrange them in a spiral pattern. Whichever way you choose, leave some space between dumplings to develop the 'wings'. Allow the bottom of the dumplings to brown. 

3. As the dumplings are cooking, add flour to a measuring cup. Drizzle water in, stirring as you do to form a thin slurry. When the bottoms of the dumplings are browned, pour the slurry into the hot pan (beware of rising steam as you do so), then cover the with lid and continue to cook until the water has evaporated and you're left with a 

4. Evert onto a serving plate. Serve immediately. Black vinegar and ginger are common accompaniments.  

04 April 2021

Chinese Roast Duck with Angelica Root "Dang Gui" Sauce Recipe

April 04, 2021 1
Chinese Roast Duck with Angelica Root "Dang Gui" Sauce Recipe

Dang gui, or Angelica root, is a Chinese herb that was restricted to only female-members of my family in my early childhood.  I had to sneakily ingest it by the tablespoon, and like all forbidden fruits, I grew obsessed with it. Now, even when my family reversed its stance, it still feels like an indulgence.

One of my favourite destination in Johor Bahru is Ya Wang. Because they're so close to the Singapore-Malaysia customs, I often end up there for breakfast right after crossing the border. And reallyso far, nobody had objected to tucking into a roast duck for breakfast. Their ducks are roasted and drizzled with herb-infused sauces, and taste absolutely decadent


With the ongoing pandemic and travel restrictions, I hadn't been back for almost a year. Dian Xiao Er is a mid-range restaurant chain that was set up in Singapore using Ya Wang’s recipes, and luckily, which remains available for all duck-related cravings. On a recent trip there, I had an inkling that I could attempt a version of this Angelica Root duck-of-my-dreams. 

It took perhaps half a dozen ducks and 12 months to tweak the recipe. There may be further changes down the line, but now I’m happy to report that this is pretty darn good as it stands.  

Chinese Roast Duck with Angelica Root "Dang Gui" Sauce 

Adapted from Crispy Roast Duck from Gordon Ramsay and Beyond Norm's Dang Gui Duck

====== INGREDIENTS ======

Duck + Marinade 
1 whole duck, about 1.5-2kg
1/2 tablespoon salt
1½ tablespoons light soy sauce
½ tablespoon five spice powder
1 tablespoon honey
½ tablespoon white pepper

Dang Gui Sauce
1 Angelica Root / Dang Gui, soaked in 2 cups water for at least 1-2 hours before cut into slices. (Reserve the water, it goes into the sauce as well)
1½ tablespoons cooking oil
2 tablespoons minced garlic
2 tablespoons minced ginger
3 star anise
1/2 tsp salt
2 tablespoons of Chinese cooking wine (optional)
2 tablespoons of brown sugar
2 tablespoons dark soya sauce
2 tablespoons oyster sauce

====== STEPS ======
Duck Marinade 
1. Butterfly the duck: Remove the wingtips, feet, head, neck and spine, which can be reserved to make stock. Flipping the duck breast-side up, press down hard on its chest to break the breast bone. This turns the duck from a hollow cylindrical structure into a flat shape for even roasting. This has two advantages: the duck can cook in a shorter period of time, and this prevents the breast meat from overcooking and drying out before the thigh meat finishes cooking.

2. In a small bowl, combine salt, light soy sauce, five spice powder, honey and white pepper. Rub the marinade evenly over the skin and inner portion of the duck. For best results, marinate the duck a day before roasting. An hour before roasting the duck, remove the duck from the fridge and allow to come to room temperature. 

3. Preheat your oven to 160C. In a baking tray lined with aluminium foil, place the duck breast-side up. Roast for 160°C for 1 hour then reduce the temperature to 140°C and cook for a further 1-1.5 hours, until until a fork goes in the thigh region with minimal resistance and the skin is crisp.

Dang Gui Sauce
4. As the duck is in the oven, prep the sauce. In a saucepan set over medium heat, heat oil until lightly smoking. Add in the minced garlic, minced ginger, star anise and the sliced dang gui. Sauté until fragrant and then deglaze with Chinese wine. Add brown sugar and then the rest of the liquid marinade ingredients, including the 2 cups of water that the dang gui was steeped in. Bring it to a boil, then cover with a lid and remove from heat. 

5. As the duck finishes roasting, pour the collected duck juices into the dang gui sauce. Return to a boil, and let simmer until ready to serve. Strain the oil out, pour the sauce over the prepared duck and serve immediately.