

Continuing my new-found obsession with no-knead doughs, I spent a good part of December baking this focaccia dough in its various iterations. As a mark to how versatile this recipe is, and also how delicious it is, nobody got sick of me cooking the same thing over and over again. I've tried different toppings, played around with the sauce, and made the dough into thick-crust pizza, which was a rousing success. This dough develops a crisp golden base and a fluffy chewiness interior, and this texture plays off well with a layer of tomato, melted cheese, mushrooms and meat.
As good as pizza can be, the dough is just as good as its origin - a no-frills focaccia topped by aromatics that are found in every household. Savoury garlic cloves and sweet onions are cheap and abundant, and fills the kitchen with an intoxicating fragrance.
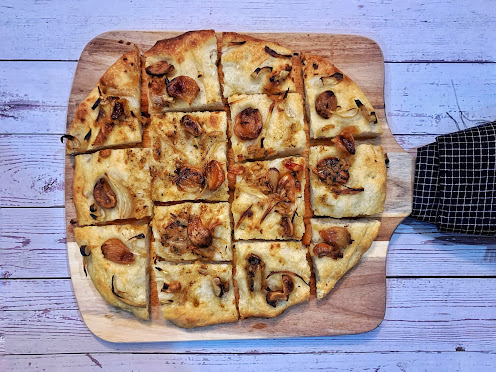
Garlic and Onion Focaccia
Adapted from Garlic Focaccia at Serious Eats
If you don't have a cast-iron skillet (I know I don't...), you can get great results with stainless steel. I use a 11" stainless steel cake pan, which develops a crisper crust than a non-stick surface.
INGREDIENTS
Focaccia Base
375g all-purpose or bread flour
11g salt
3g instant yeast
245g water
3 tablespoons extra-virgin olive oil
Roasted Garlic
2 heads of garlic, whole
1 tablespoon (15ml) extra-virgin olive oil
1 tsp salt
Garlic Butter (optional)
2 tablespoons (30g) unsalted butter
1 tablespoon extra-virgin olive oil
2 teaspoons dried oregano
1/2 teaspoon red pepper flakes
For the Roasted Garlic:
Adjust oven rack to center position and preheat oven to 350°F (180°C).
Break the heads of the garlic apart slightly. On a sheet of aluminum foil, drizzle the garlic with 1 tablespoon (15ml) olive oil and sprinkle with salt. Leave each garlic clove uncut: roasted whole garlic cloves are sweet and fragrant, which slicing into the garlic cloves, even a little, will result in a harsh and pungent garlicky taste. Wrap tightly with foil and roast for about an hour, until garlic is completely tender. Let cool and refrigerate until use.
For the Garlic Butter:
Mince 4 raw cloves of garlic. Combine remaining 1 tablespoon (15ml) olive oil with butter in a small skillet and melt over medium-low heat. Add garlic, oregano, and pepper flakes and cook, stirring, until fragrant and garlic is just beginning to brown, about 1 minute. Transfer to a small bowl and lightly season with salt. Set aside.
For the Focaccia
In a large bowl, mix flour, salt, yeast and water until there are no pockets of dry ingredients. (The bowl should be large enough to accommodate the dough proofing, which can triple in size.)
Cover bowl with plastic wrap, then allow dough to rest at room temperature for at least 8 hours, and up to 24 hours. In a warm environment, the dough may overproof near the end of that range. Dough should rise dramatically and fill bowl.
Add 3 tablespoons (45ml) olive oil to your stainless steel pan. Do not flour the pans. Tip your dough out of the bowl and onto the stainless steel pan, and coat the surface with the olive oil. Press the dough flat and outwards, spreading oil around the bottom and up the sides of the pan as you do so. Cover tightly with plastic wrap and let dough stand at room temperature for 2 hours.
After 2 hours, the dough should be relaxed and mostly filled up to the edges of the pan. Using your fingertips, burst any large bubbles that appear. Gently lift off one edge of the dough to let air bubbles underneath escape, then repeat along the other edges until there are no more air bubbles and the dough is evenly spread around the pan.
Peel the roasted garlic cloves. Embed whole roasted garlic cloves evenly over surface of dough. Add onion slices.
When ready to cook, set a tray at the lowest rack. Preheat oven to maximum temperature (which is about 210C for mine). As you put the focaccia in, turn off the top heating coil (leaving only the bottom coil on.) Bake for 20-25 mins, until the bottom is browned and crisp (you can remove the focaccia from the oven and inspect with a thin spatula. If bottom is not as crisp as desired, return to oven.) Then, turn on the top coil and transfer the focaccia to the top rack. Bake for another 3-4 mins, until the top has reached it's desired colour. Remove from oven and drizzle with garlic butter (as below).
Remove focaccia from the pan and leave it to cool slightly on a rack. This prevents steam from accumulating and softening the crust.


