Chik's Crib

17 April 2021

Risotto With Crispy Mushrooms Recipe - A Risotto Cooked in the Oven

April 17, 2021 0
Risotto With Crispy Mushrooms Recipe - A Risotto Cooked in the Oven


I ambitiously bought several kilos of rice on a late-night grocery shopping spree last year, and filled my larder with bags of Japanese sushi rice, Arborio Rice and Calasparra Rice. I'm still getting around to the sushi rice, but I've been having a grand time exploring Italian and Spanish recipes. 


This recipe is one great find, and became an instant favourite. Most of the work is done in the oven. The mushrooms gradually crisp up in the oven over an hour, leaving you with ample time to leisurely dice the onions, grate the parmesan and indulge in a glass of pre-dinner wine. 


Risotto With Crispy Mushrooms Recipe 

If you're cooking for someone who enjoys a meal with a portion of protein on the side, seafood such as seared scallops, squid or prawns would be a welcome addition. 

Original Recipe from Epicurious
Makes 3-4 servings

INGREDIENTS

1 lb. mixed wild, shiitake, and/or crimini mushrooms, broken into pieces or sliced 1/4" thick (about 4 cups)
3 garlic cloves, peeled, thinly sliced
6 thyme sprigs
1/4 tsp. crushed red pepper flakes
1/4 cup plus 2 Tbsp. extra-virgin olive oil, plus more for drizzling
1/4 + 1/4 tsp fine salt
1 medium onion, finely chopped
1 cup arborio rice
1/2 tsp. freshly ground black pepper
1/2 cup dry vermouth or white wine
2.5 + 0.5 cups homemade chicken stock or low-sodium chicken broth
60g finely grated Parmesan 
2 Tbsp. cold unsalted butter, cut into pieces
1/2 tsp. finely grated lemon zest
1/3 cup coarsely chopped parsley leaves
Lemon wedges (for serving)

STEPS

1. Preheat oven to 175°C. Set a rack in bottom third of oven. 


2. Combine sliced mushrooms, garlic, thyme, red pepper flakes, 1/4 cup olive oil, and 1/4 tsp. salt on an unlined rimmed baking sheet. Roast on bottom rack for 45 minutes to an hour,  until the slices are deeply golden brown and crisped. As the mushrooms roast, they will release their water contents. After 10 minutes into roasting, any liquid can be removed (to reserve for cooking the risotto. About 30 minutes into roasting, scrape and toss the mushrooms to prevent burning. When the mushrooms are just about done, set the oven to broiler and place the tray of mushrooms in the top rack to crisp the sides up further. Remove from oven and let cool.


3. As the mushrooms are roasting, heat 2 tbsp. olive oil in a large ovenproof pot set over medium-high heat. Add onion and cook for about 3–5 minutes, stirring often, until softened and slightly translucent. Stir in rice; season with pepper and 1/2 tsp. salt. Cook, stirring occasionally, until some grains are translucent, about 2 minutes. Add vermouth to deglaze the pot. Stir, until most of the vermouth has evaporated, and then add the reserved mushroom juice. Add 2.5 cups stock (reserving 1/2 cup stock for afterwards). Allow the stock to come simmer, then cover with an ovenproof lid and transfer to the oven and continue cooking for about 15–18 minutes, until liquid is mostly absorbed but rice is still slightly firm in the center.


4. Return pot to medium heat on a stove. Add the remaining 1/2 cup stock stir constantly, until the rice is tender but still has some bite, about 2 minutes. Remove from heat and stir in Parmesan, butter, and lemon zest. Season to taste with salt, if needed. 


5. Portion the risotto into individual portions, top with crispy mushrooms, parsley and any protein. Serve immediately. Serve with lemon wedges alongside.

10 April 2021

Dumpling Wings Recipe

April 10, 2021 1
Dumpling Wings Recipe


Using equal parts cornflour/AP flour leads to thin, wafer-like and non-lattice structure (as compared to the lattice structure using tapioca starch - as below) 

Of all the recipes that I do, the ones that get revisited a lot more are those that can be served for breakfast, lunch, dinner or even as a between-meal snack. That means things that are things that are simple and fast (no slow roasts, and not platefuls of carbohydrate). An omelette is one such dish, as are Kimchi pancakes and dumplings. Today, I'll like to, if I can, to ponder over my love for dumplings. 

Of course, this isn't a recipe to make dumplings from scratch. This post is about a simple trick to get crispy thin "wings" attached to your pan-fried dumplings. Using frozen, store-bought dumplings are perfectly fine. Given that the technique was first developed in Tokyo in the 1980s, Japanese gyoza would be perfect for this, though I've seen Chinese restaurants employ this technique for their 饺子 (potstickers). I've gotten my dumplings from a store near my workplace in Jurong Gateway at 山东東记拉面小笼包 (the current rate is a bag of frozen dumplings at 30 for $10, and as you can see, these are huge and juicy!) My home non-stick skillet is 8-inch, though any size would work as long as the dumplings fit and there is a well-fitting lid.  

Pan-frying dumpling involves adding dumplings to a hot pan with a thin layer of oil until the bottom is browned, then adding water to the pan, covering it with a lid and steaming the dumplings well cooked on the inside. The trick to getting delicate crisp wings is adding half a tablespoon of tapioca starch to the water you use to steam the dumplings. As the water cooks off, the starch remains and forms the wings.

Tapioca starch

Dumpling Wings Recipe
Original recipe from J. Kenji López-Alt
I've tried this recipe with both gyoza and regular Chinese dumplings. The essence remains the same, though plumper dumplings (like the Chinese ones I've made with) will require a bit more water to completely cook the dumplings.  

INGREDIENTS

1-2 tbsp flavourless oil, such as canola oil 
Dumplings, fresh or frozen
80ml water 
1 tbsp tapioca flour
Black vinegar, with 
julienned ginger (cut into long thin strips) - optional

STEPS

1. Set a non-stick pan over medium-high heat. Add a thin layer of oil. 

2. When the oil gets hot, add dumplings. If using gyoza, you may choose to arrange them in a spiral pattern. Whichever way you choose, leave some space between dumplings to develop the 'wings'. Allow the bottom of the dumplings to brown. 

3. As the dumplings are cooking, add flour to a measuring cup. Drizzle water in, stirring as you do to form a thin slurry. When the bottoms of the dumplings are browned, pour the slurry into the hot pan (beware of rising steam as you do so), then cover the with lid and continue to cook until the water has evaporated and you're left with a thin crisp layer.

4. Evert onto a serving plate. Serve immediately. Black vinegar and ginger are common accompaniments.  

04 April 2021

Chinese Roast Duck with Angelica Root "Dang Gui" Sauce Recipe

April 04, 2021 1
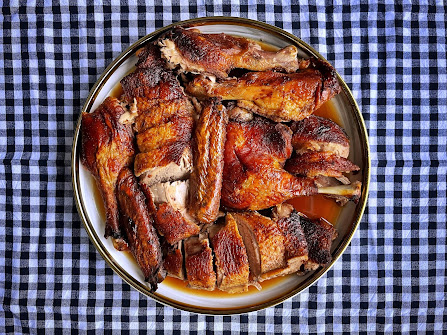
Chinese Roast Duck with Angelica Root "Dang Gui" Sauce Recipe

Dang gui, or Angelica root, is a Chinese herb that was restricted to only female-members of my family in my early childhood.  I had to sneakily ingest it by the tablespoon, and like all forbidden fruits, I grew obsessed with it. Now, even when my family reversed its stance, it still feels like an indulgence.

One of my favourite destination in Johor Bahru is Ya Wang. Because they're so close to the Singapore-Malaysia customs, I often end up there for breakfast right after crossing the border. And reallyso far, nobody had objected to tucking into a roast duck for breakfast. Their ducks are roasted and drizzled with herb-infused sauces, and taste absolutely decadent


With the ongoing pandemic and travel restrictions, I hadn't been back for almost a year. Dian Xiao Er is a mid-range restaurant chain that was set up in Singapore using Ya Wang’s recipes, and luckily, which remains available for all duck-related cravings. On a recent trip there, I had an inkling that I could attempt a version of this Angelica Root duck-of-my-dreams. 

It took perhaps half a dozen ducks and 12 months to tweak the recipe. There may be further changes down the line, but now I’m happy to report that this is pretty darn good as it stands.  

Chinese Roast Duck with Angelica Root "Dang Gui" Sauce 

Adapted from Crispy Roast Duck from Gordon Ramsay and Beyond Norm's Dang Gui Duck

====== INGREDIENTS ======

Duck + Marinade 
1 whole duck, about 1.5-2kg
1/2 tablespoon salt
1½ tablespoons light soy sauce
½ tablespoon five spice powder
1 tablespoon honey
½ tablespoon white pepper

Dang Gui Sauce
1 Angelica Root / Dang Gui, soaked in 2 cups water for at least 1-2 hours before cut into slices. (Reserve the water, it goes into the sauce as well)
1½ tablespoons cooking oil
2 tablespoons minced garlic
2 tablespoons minced ginger
3 star anise
1/2 tsp salt
2 tablespoons of Chinese cooking wine (optional)
2 tablespoons of brown sugar
2 tablespoons dark soya sauce
2 tablespoons oyster sauce

====== STEPS ======
Duck Marinade 
1. Butterfly the duck: Remove the wingtips, feet, head, neck and spine, which can be reserved to make stock. Flipping the duck breast-side up, press down hard on its chest to break the breast bone. This turns the duck from a hollow cylindrical structure into a flat shape for even roasting. This has two advantages: the duck can cook in a shorter period of time, and this prevents the breast meat from overcooking and drying out before the thigh meat finishes cooking.

2. In a small bowl, combine salt, light soy sauce, five spice powder, honey and white pepper. Rub the marinade evenly over the skin and inner portion of the duck. For best results, marinate the duck a day before roasting. An hour before roasting the duck, remove the duck from the fridge and allow to come to room temperature. 

3. Preheat your oven to 160C. In a baking tray lined with aluminium foil, place the duck breast-side up. Roast for 160°C for 1 hour then reduce the temperature to 140°C and cook for a further 1-1.5 hours, until until a fork goes in the thigh region with minimal resistance and the skin is crisp.

Dang Gui Sauce
4. As the duck is in the oven, prep the sauce. In a saucepan set over medium heat, heat oil until lightly smoking. Add in the minced garlic, minced ginger, star anise and the sliced dang gui. Sauté until fragrant and then deglaze with Chinese wine. Add brown sugar and then the rest of the liquid marinade ingredients, including the 2 cups of water that the dang gui was steeped in. Bring it to a boil, then cover with a lid and remove from heat. 

5. As the duck finishes roasting, pour the collected duck juices into the dang gui sauce. Return to a boil, and let simmer until ready to serve. Strain the oil out, pour the sauce over the prepared duck and serve immediately. 

14 March 2021

Tamarind Pork Ribs With Scallions and Peanuts

March 14, 2021 1
 Tamarind Pork Ribs With Scallions and Peanuts

Does a rose by any other name really smell as sweet? I spent most of my life with a knee jerk avoidance to assam, after one too many overly spicy experiences. Meanwhile, I took every opportunity to eat my own weight in Pad Thai, and can scuff down an entire platter of Tamarind Fried Fish at my favourite Thai restaurant, no problem. It’s from the restaurant where I’ve first heard of tamarind and fell in love with its sour-sweet notes. This (?) exotic spice is tart, and balances the richness of meat or carb-heavy dishes.  

I wasn’t exactly sure when I found out that tamarind and assam is the exact same thing, but you can bet I felt all kind of silly afterwards. I quizzed everyone in my household, and everybody know about it, other than well, me. But because everybody in my family have better things to do than to keep a blog, I guess you’re stuck with me...

This recipe is quintessentially Western, serving up a platter of roasted ribs dripping in sauce. But with the addition of tamarind, think of this like a protein laden equivalent of Pad Thai: sour and sweet, a hint of spicy undertones, and a generous scatter of crushed peanuts. 

Spicy Tamarind Pork Ribs With Scallions and Peanuts

Adapted from the New York Times

INGREDIENTS

2 racks baby back or spare ribs (about 2 1/2 pounds each)
100g +100g (1 cup total) dark brown sugar
2 teaspoons garlic powder
1 teaspoon ground cayenne
1 teaspoon black pepper
1/2 tablespoon salt
120g (½ cup) tamarind concentrate/purée
1 chili, stemmed and chopped
2 tablespoons honey
2 tablespoons grated ginger
¼ teaspoon ground nutmeg
1 tablespoon lime zest (from about 2 limes)
½ cup thinly sliced scallions
¼ cup peanuts, crushed 

STEPS

Heat the oven to 150C (300F). 

In a small bowl, combine 100g brown sugar with garlic powder, cayenne, pepper and salt. Pat ribs dry with paper towels, and rub the brown sugar mix all over the ribs. Place ribs in a baking tray, and cover the top as snuggly as you can with aluminium foil. Cook for about 2 to 2 1/2 hours, until the meat is tender but not falling off the bone. Let cool before unwrapping (be careful of escaping steam!) 

While the ribs bake, mix tamarind concentrate/purée with 180ml water, and stir to combine. Sieve and discard the pulp and the seeds. Pour the tamarind liquid into a small saucepan and add the remaining 100g of brown sugar with chile, honey, ginger and nutmeg. Stir to combine. Set saucepan over medium-low heat and allow the liquid to simmer until thickened and slightly reduced, about 8 minutes. Remove from heat, add the lime zest, season to taste with salt and allow to cool completely.

When the ribs are cooled enough to handle, cut each rack into 4- to 6-rib portions and arrange them meat-side up on a baking sheet. Brush the tops with the tamarind glaze and broil until glaze is set and caramelized in spots, about 3 to 5 minutes.

Slice into individual ribs and then brush again with any remaining glaze, if any. Transfer ribs to a serving platter. Top with crushed peanuts and scallions, if using.

07 March 2021

Dorie Greenspan’s Lisbon Cake

March 07, 2021 0
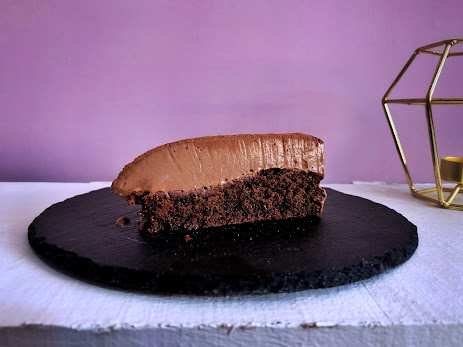
Dorie Greenspan’s Lisbon Cake


Dorie Greenspan’s Lisbon Cake is, in essence, chocolate ganache over a dense chocolate cake base. It tastes incredibly luxurious and is quite something. Even after a long chill in the fridge, the chocolate ganache would remain soft and glossy; and, no matter how many times you’ve done this before, the moment when you try unmolding the cake is always filled with a sense of thrill/dread (could I have inexplicably buggered up this cake??). And then, as the cake stands upright, tall and proud, you do too. 

I used a metal cake pan with a removable bottom, one that is fast becoming my favourite-est cooking equipment. It makes unmolding cakes stupidly easy, and especially in this recipe, it’s a cinch. If you have a regular cake pan, the original recipe (link below) have steps to ensure a smooth unmolding.


Lisbon Chocolate Cake

Adapted from Dorie Greenspan‘s NYT article

Makes an 8-inch cake 


INGREDIENTS

FOR THE CAKE:

115 grams unsalted butter, cubed, plus more for greasing the cake pan

30 grams unsweetened cocoa powder

1 ½ tablespoons cornstarch

¼ teaspoon baking powder

¼ teaspoon fine sea salt

140 grams semisweet or bittersweet chocolate, coarsely chopped

100 grams granulated sugar

large eggs, chilled


FOR THE GANACHE:

300ml +120ml heavy cream

170 grams semisweet or bittersweet chocolate, finely chopped


FOR THE TOPPING:

3 tablespoons unsweetened cocoa powder


STEPS

CAKE

Center a rack in the oven, and heat oven to 160C. Butter the sides of a cake pan (mine has a removable base) and set aside.  


Sift the cocoa powder, cornstarch, baking powder and salt in a medium bowl. Mix well and set aside. 


In a saucepan set over the lowest possible heat, melt butter. When the butter is just-about melted, add chocolate and stir constantly, until the chocolate has fully melted and the mixture is smooth and glossy. If worried about scorching the chocolate this way, you can intermittently remove the saucepan from the fire, or use a water bath, although I’ve never found that necessary. 


Stir in the sugar. Add the eggs one by one, mixing them in vigorously with each addition and then beating the mixture for a full minute after the last egg is added. 


Stir in the dry ingredients and mix well. Pour into prepared cake pan. On the tabletop lined with a dishcloth, rap the cake pan on the tabletop to let any trapped bubbles out of the mixture.


Bake for 18 to 20 minutes, until a toothpick inserted into the center comes out clean, or with only a tiny streak of chocolate. Transfer to a rack and let completely cool to room temperature. Transfer to your refrigerator and chill it thoroughly. Attempting to add your chilled ganache to a warm cake is a sure way melt the ganache and undo all your hard work. So don’t cheat!


GANACHE

Pour 300ml cream into a small saucepan set over medium heat. Warm the cream until it almost comes to a boil, and then remove from heat and add in the chocolate. Mix well with a whisk.  


Refrigerate the ganache for about an hour, taking it out and giving it a good whisk every 10 minutes or so, until the ganache is thick enough to make tracks when you stir. 


In a separate bowl, whisk the remaining 120ml cream over high speed until it holds medium peaks. With a spatula, fold the whipped cream into the ganache. Pour the ganache over the chilled cake. Refrigerate for at least 2 hours. 


SERVING

Unmold the cake, and place onto a serving board. Cut using a long knife, wiping the knife between cuts. Using the finest sieve you have, dust a layer of cocoa powder over each slice. Serve immediately.  

After assembly, the cake will keep in the refrigerator for up to 2 days.