Chik's Crib

21 August 2020

Stir-Fry Vietnamese Caramelised Chicken Recipe

August 21, 2020 0
Stir-Fry Vietnamese Caramelised Chicken Recipe

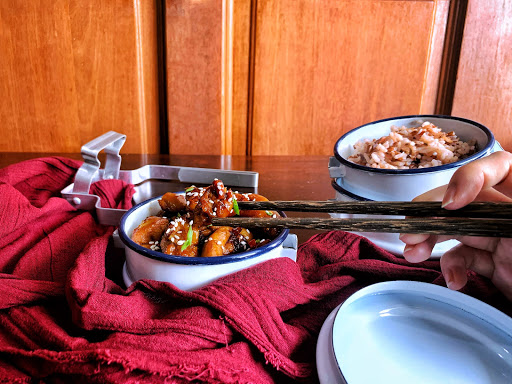
My mom took a bite and put her fork down. My dad asked me about each step of this recipe. And after they cleared their plates, they lingered on and picked at whatever's left. That's how I knew this stir-fry recipe is a hit.    

The caramelised sugar and fish sauce is an amalgamation of sweetness and unami, and despite my reservations at the amount of fish sauce in the recipe, it turned out quite fine. Fish sauce can be quite pungent, and while common in Vietnamese, Thai and Teochew dishes, is not typical in other Chinese cuisines, let alone in a Cantonese kitchen.   

As I grow older, I begin to appreciate traditional Asian flavours more. Fish sauce and dashi have found their place in our fridge, and herbs like lemongrass can brighten up a dish quite like nothing else out there. We now have a small thriving patch of lemongrass in our gardens, growing alongside spring onions, lime trees and pots of chilli - undemanding plants that are cheap to grow. 


This is an easy recipe that doesn't take much time to do. The chicken would benefit from a quick toss in salt and cornflour about 30 minutes beforehand (but it's no great loss if you omit this step if rushed for time). You can put the rest of the ingredients together quickly as the sugar caramelises on the stove.  


Stir-Fry Vietnamese Caramelised Chicken 

Adapted from Milk Street Food


INGREDIENTS

=============

2 pounds boneless, skinless chicken thighs, trimmed and cut into 1½-inch pieces

2 tbsp corn flour 

50g (¼ cups) granulated white sugar

4 tablespoons coconut water or water, divided

3 tablespoons fish sauce

2 fresno or serrano chilies, stemmed and sliced into thin rings

1 stalk lemon grass, trimmed to the lower 5 or 6 inches, bruised

2 teaspoons finely chopped fresh ginger

1 teaspoon ground black pepper

1 tablespoon lime juice

2 spring onions, sliced thinly and diagonally


STEPS 

============

Season the chicken lightly with salt. Toss with corn flour to velvet the meat pieces. Set aside for 30 minutes. 


In a large pan, combine sugar and 2 tablespoons of the coconut water until no dry lumps remain. Set over medium-high heat and swirl the pan occasionally, until the sugar turns deep brown and begins lightly smoking, about 4 to 6 minutes. 


Remove the pan from the fire. Carefully add fish sauce and the remaining 2 tablespoons coconut water; the mixture will hiss and release steam. Return the pan to medium heat and bring to a simmer, stirring as you do until no hardened caramel remains in the mixture. Add the chilies, lemon grass, ginger and pepper, and mix the spices in with the caramel for about 30 seconds, until they release their fragrance. Increase to medium-high and stir in the chicken slices. Return the mixture to a simmer and let cook for 10 to 14 minutes, until the sauce thickens. Remove from the heat and stir in the lime juice. 


Garnish with chopped scallions and chili. 

10 August 2020

Cold Brew Coffee Recipe

August 10, 2020 0
Cold Brew Coffee Recipe


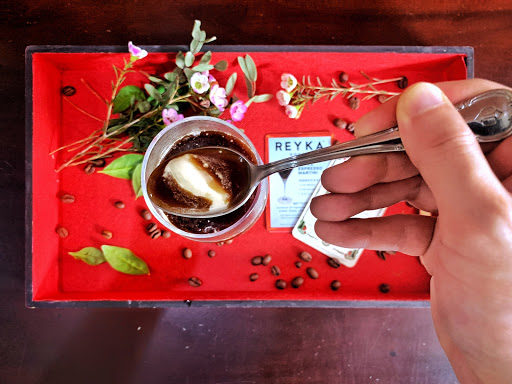
It is astonishingly humid in Singapore now, and even being in the shade at home brings little comfort, when the open window brings even warmer air into the house. The middle of the year is typically when Singaporeans leave for vacations, but like everything else in this current health crisis, all my travel plans went up in smoke. While the borders to other countries remain shut, and I’m still leery even of unnecessary trips out of the safety of my house, it seems the only thing to do is to crank up the AC and to drink our way through the day with plenty of beer, coconuts and cold brew coffee. And occasionally, perhaps spending an afternoon arranging coffee beans on a table. 


But this cold brew recipe is worth all the extra effort you bring to the table (see what I did there?). Each glass brings a brief reprieve from the heat, and between everyone in the family (well, mainly me), I've been running through my coffee bean stash something fierce. 


Amidst all the bad news this year that we had been hearing about on a daily basis, it's nice to be able to unplug for a while, kick back with chilled glass of coffee and enjoy a pleasant afternoon.   


Cold Brew Coffee Recipe

Original Recipe from Serious Eats

INGREDIENTS

170g whole coffee beans (about 1 1/2 cups whole beans), coarsely ground

1020g (about 4 1/4 cups) cold water

STEPS

1. In a large pot, combine ground coffee and water. Stir until well mixed. Cover with a lid and let stand at room temperature, for 8 to 12 hours.

2. Strain well. Transfer the concentrate into an airtight container. Refrigerate until well-chilled.

To serve: Combine fresh milk with the coffee concentrate. Adjust proportion to taste. 

Variation: Melbourne Iced Coffee: Taking a leaf out of one of my favourite cafes in Melbourne, substitute the milk for a scoop of vanilla ice cream for a richer creamier taste.


01 June 2020

Chinese Roasted Pork Belly Recipe, Version 4.0

June 01, 2020 0
Chinese Roasted Pork Belly Recipe, Version 4.0
Version 3.0
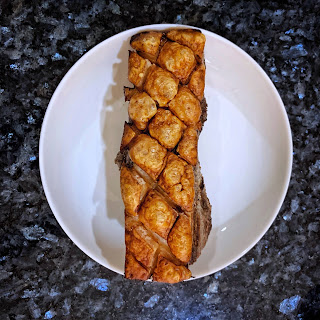
Way back in 2017, when my housemates and I bought 5 kilos of pork belly and started roasting pork bellies, this has been been a recipe that I revisit every so often. It didn't always turn out successful, but after several years of revising the original recipe that was given to me, I think I'm near done with tweaking the recipe!

One of the good changes I'd experienced? A change in mindset. The 2017 snob who declared that it was essential to have an oven capable of reaching rip-roaring, flames-from-the-depths-of-hell has been proven wrong. My current oven is a cheap standalone one which, at 2 years of age, isn't capable of reaching above 200C anymore:(. Yes, I checked with an oven thermometer. But no matter. With this revised way of making pork belly, the skin has been crispier than it has ever been. 

Pic by Rainer, circa 2017

Of course, those of us with a good oven should find it easier. We once accidentally ended up with perfect crunchy, blistered skin on our pork shoulders in Tasmania even without drying out the skin beforehand, just by virtue of the great oven at the Airbnb. So crunchy, I half-expected the neighbours to peer into our windows to see what we were up to. (Well also, our enthusiastic roasting triggered the fire alarm a couple of times - we should have opened the windows!)  

For those interested in the technical points on how it works: 
A) Leaving the pork uncovered in the fridge overnight dries out the pork skin completely. When roasted in the oven, the skin becomes unbelievably crispy. 

B) Submerging the meat portion of the pork in broth during roasting keeps the meat soft and tender, preventing it from getting dried out during roasting even as the skin becomes blistered and crunchy. 

And that's it! That's the main takeaway from this recipe. I admit I don't even measure the ingredients anymore, and neither should you. I just scatter the spices over the pork meat willy-nilly. Unlike baking, most savory dishes have a wide leeway and most recipes are a guide rather than a didactic set of instructions. If you don't feel comfortable eyeballing, you can use five spice powder: white pepper at 1:3 ratio. But honestly, you don't need to know that. 

Now, go forth and treat yourself to some pork belly. 

Just be sure to keep your windows open. 


Chinese Roasted Pork Belly Recipe, Version 4
Many recipes online recommend pricking the pork belly skin or  scoring it with a sharp knife. Honestly, I longer do either. I find that they interfere with the crisping up of the skin and risk wetting it. 

INGREDIENTS
1 kg Pork belly
Five Spice Powder / White Pepper / Salt (ratio of 1 tbsp: 1 tsp:
1 tsp)
Salt (Additional salt for the skin)

STEPS

1. Rub the sides and bottom generously with five spice powder, and sparingly with white pepper. Be careful not to get any on the skin.

2. Use a paper towel to pat the skin dry, and rub away any five-spice powder. 

3. 
Rub in 3-4 teaspoons of salt over the pork belly skin. 

4. 
Rest the pork uncovered and skin-side up in the fridge overnight. 

When ready to cook the pork belly, 
5. Preheat oven to 180C. Place the pork belly skin-side-up in a roasting tray set on the middle rack of your oven. Carefully p
our water into the roasting tray, taking care not to splash any liquid onto the skin, until the liquid level reaches the fat layer just below to the pork skin. Roast for 1 - 1.5 hours, until a fork goes in through the meat easily from the side and diagonally down (taking care not to attempt to pierce through the skin). 

6. When the meat is tender, turn the oven up to 'low broil', or about 250C. Keep the pork belly on the middle rack, letting the skin blister and turn crunchy. This may take anywhere from 5-15 minutes. 
Tapping on the skin with a metal utensil should create a deep, solid sound. (For those with a stovetop oven, like me, you can achieve the same effect by turning off the bottom heating coil while leaving the top heating coil on. Reduce the temperature to 160C for this type of oven and continue roasting for 4-5 mins, until the skin is crunchy.) 

7. Slice and serve. 

Variations
This is less of a recipe, and more of a guide to make crispy pork belly. You can use any spice that you fancy; and even premixed spices are good. We particularly like using a incidentally-bought spice mix from Kotanyi picked up by my parents when they were travelling in Poland: the przyprawa do zeberek z miodem. 

Last edited on 28/02/26: updated to include instructions for a regular oven in addition to stovetop ovens. 


25 May 2020

James Beard's Chicken with 40 Cloves of Garlic

May 25, 2020 0
James Beard's Chicken with 40 Cloves of Garlic

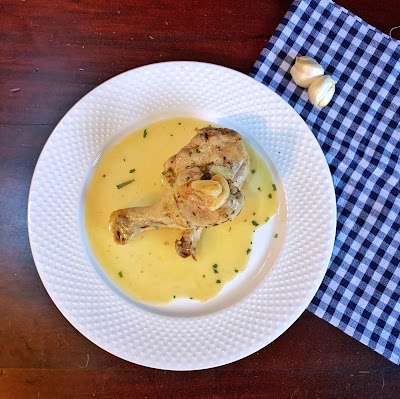
Coming off a particularly challenging work month and dusting off my kitchen mittens, I thought I should return to cooking with an easy-to-make recipe from an old master. This is a Provençal recipe, and made with hearty ingredients that are both cheap and plentiful. James Beard encountered this dish when he was stationed in the region during World War II. Eighty years later, with the world wrangling with yet another global crisis with an economic downturn, it's a good time to start using wallet-friendly ingredients in my cooking.


This dish has absolutely none of the pungent garlicky smell that you'd find from raw garlic. 
As this video showcasing the ever-delightful Jacques Pépin explains (skip to 4:26), there are 2 kinds of essential oil found in garlic. When garlic is smashed or cut, they are exposed to each other, producing the familiar pungent smell of garlic. When garlics are instead kept whole and gently slow-roasted, you end up with this smooth mellow sauce that is both sweet and rich. It only has the barest hint of garlic, and you can scarf it down the entire platter without smelling like you'd just vampire-proofed the entire household.

James Beard's Chicken with 40 Cloves of Garlic
Adapted from James Beard Foundation
This recipe is easy to make and serve, and minimum prep work is required. Searing the chicken takes 5 minutes on each side, giving you plenty of time to peel the amount of garlic.

INGREDIENTS
10 chicken pieces, in a combination of drumsticks and thighs
1 teaspoon salt
1 teaspoon black pepper
1/4 teaspoon ground nutmeg
3 tablespoons olive oil
40 cloves of garlic, approximately 3 bulbs, peeled 
2 tablespoons dry vermouth
1 tablespoon dried tarragon
1 cup low sodium chicken broth

STEPS
1. Season the chicken with salt, black pepper, and nutmeg.

2. Preheat oven to 180C. 

3. In a large pot, heat olive oil over medium-high heat. Sear the chicken pieces on both sides until a golden crust forms, about 4 to 5 minutes on each side. Work in batches if you have to, taking care not to overcrowd the pot. Remove the chicken, and add in the garlic. Sauté garlic for 6 to 8 minutes, until golden brown

4. Deglaze the pot with vermouth. Add chicken broth, tarragon, and return the chicken to the pot. Bring to a boilCover with the lid and and place the pot into the oven for about an hour, until the chicken is tender. 

5. Serve immediately with hot toast. Softened garlic can be spread on bread.

26 February 2020

Stella Park's New York Cheesecake

February 26, 2020 0
Stella Park's New York Cheesecake


Hello friends! It's a couple of months into the new year, and looking back at 2019, it's a year with much to be thankful for, and I could think of no better one to cap off the decade. 

There's a lot to be grateful about, and at the very top of my list would be the wonderful folks in my life. These people make life fun. And the colleagues I've met, who made working more enjoyable than I thought possible. Also, I developed a new newfound obsession with Dungeons and Dragons, which is quite enjoyable indeed (although to everybody else who don't play - their eyes kind-of glaze over when I describe the game. But I won't hold their bad tastes against them...)

One of the biggest thing that sparked joy this year was my trip to California, where amongst all the sightseeing, my sister and I squeezed in perfect moments of dessert-making in the quiet mornings before her kids return from school.  One outstanding recipe was this cheesecake, courtesy of Stella Park. To be honest, her article on cake pans won me over already, namely, how springform pans are substandard pieces of kitchen equipment. Restaurant cheesecakes are gorgeous pieces of work: tall, majestic and towering, while springform pans, with its shallow built, createsunimpressive squat-looking cheesecake slices. Plus, the deep grooves of springform pans make the extra cleaning a pain-in-the-you-know-where. I didn't think someone out there shares my sentiments until, well, I came across her article. She recommends a loose-bottom cake pan instead. 

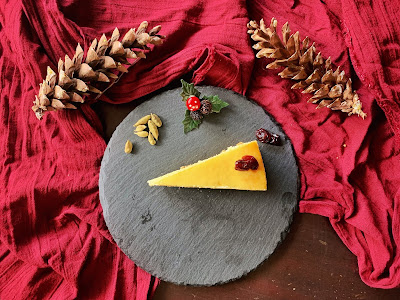
Her brownie recipe displaced my old favourite brownie recipe, and this is another winning recipe. I returned to this recipe again and again over the next few months. I've made it for Christmas (as the festive pictures show), and again for the New Year's, and increasingly, for no particular occasions other than satiating my cheesecake cravings. I usually find most Western-style cheesecakes too sweet and sit too heavily in the stomach. Coming across this recipe completely changed my perspective. It was a breath of fresh air. It's simply out-of-this-world, and I'll be hard-pressed to find a cheesecake that is better than this. 


Stella Park's New York Cheesecake
Adapted from Serious Eats
Makes a 8-inch wide, 3-inch tall cheesecake 
I'd made a few tweaks to the original recipe (mostly because I didn't have the cash to spring for a 4-inch tall cheesecake pan, and ended up with this budget beauty, which I'd come to love.) The original recipe's goat cheese profile was also a little hefty for me. Depending on the goat cheese available in your region, you may end up scaling up or down to personal preference

Ingredients
250g graham biscuit
100g unsalted butter, melted

500g cream cheese, near room temperature
110g goat cheese 
1/2 tbsp lemon juice 
1/2 tbsp vanilla
1/16 tsp salt
1/16 tsp orange blossom water (optional) 
180g granulated sugar (or toasted sugar if you can swing it)
3 large eggs
95g heavy cream

Steps1. 
If using a two-piece pan, wrap the bottom piece in foil. Lightly grease the bottom and the sides.

2. 
Bash the graham biscuits into fine crumbs, and drizzle in the melted butter and salt. Mix until well combined. Using a silicone spatula or your hands, press the crumbs into a flat layer along the bottom of the pan.

3. 
Preheat the oven to 230°C and set the oven rack to the middle. 

4. 
In a large bowl, beat cream cheese, goat cheese, lemon juice, vanilla extract, salt, and orange flower water (if using) on low until roughly combined, and then increase to medium and continue until the mixture is perfectly smooth (about 5 minutes.) Reduce speed to medium-low, add the sugar all at once. Mix only until well combined. 

5. 
Place a single-mesh strainer over the bowl, then add the eggs, whisking in the strainer until they pass through. Discard any clots of chalazae that remain in the sieve. Resume mixing on low until well combined. 

6. 
In a saucepan, bring the cream to a full boil. While mixing the cream cheese mixture at low speed, add the hot cream in a steady stream. This warms the batter, which helps release any air pockets introduced in mixing while reducing the overall bake time. Mix for a few seconds more and then stop. 

7.

Pour the cheesecake batter into the cake pan. Gently rap the cake pan against a cloth set on a table to bring any air bubbles to the surface, and then pop the air bubbles with a spoon or butter knife.  

8.  Bake at 230°C until the edges of the cheesecake are puffed and dry to the touch, about 15-18 minutes, rotating the baking sheet midway to ensure even browning. Browning leads to a deeper, richer cheesecake. (For comparison's sake, the cheesecake in the pictures wasn't sufficiently browned.) 

9.

Turn off the oven, crack open the door, and let it stand ajar 10 minutes. Then close the door and resume baking at 120°C for 30-40 minutes, until the outer edge of the cheesecake feels firm but the centre is still wobbly. (This wobbly zone should be no more than 3-inches wide.) 

10.

Remove from the oven and let the cheesecake cool for 15 minutes, then run a thin knife around the sides to loosen the cheesecake from the sides (this helps the cake settle evenly as it cools). Continue letting it cool at room temperature for at least 1 hour before covering it to refrigerate until cold to the core, at least 12 hours.

Notes:

Excess cheesecake batter can be stored for up to one week. After Step 6, transfer the batter into an airtight container and refrigerating it. Bring cold batter to room temperature before baking.