The last few weeks in Singapore came as a welcome reprieve from the chilly autumn-winter intersection in Melbourne, where I was spending my days trying to figure out how to keep my butt warm. It was nice to put life in Melbourne on hold and return home and hang out with family for a bit. I revisited some of my favourite zichar hunts in Singapore: the ever-impressive West Coz Cafe and the Star Yong Kwang BBQ in Alexander, as well as tried some impressive new stalls in Whampoa Food Market. I even managed to fit in cheeky cross-border visits to Malaysia, and updated the JB list of attractions.
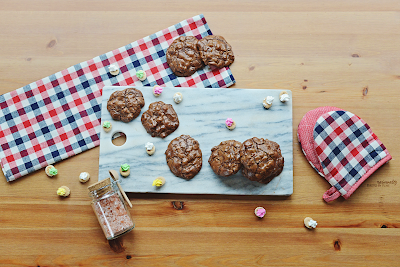 While in Singapore, other than a weekend course on macaron-making, I put a moratorum on baking as I had no idea where any of my baking utensils went. These chocolate chubbies were at the top of my to-do list when I returned to Melbourne, and within an hour of gathering flour and chocolate out of my pantry, I pulled out some of the most gorgeous cookies that I ever seen out of the oven. These cookies have a chewy brownie texture with a shiny meringue-like surface, almost reminiscent of Alice Medrich's Cocoa Brownies recipe. If you are fond of chocolate, this is the recipe for you: I never seen a recipe calling for so much chocolate before. One question I had (and everybody online as well) was the reasoning behind the mix of 100% unsweetened chocolate and bittersweet chocolate (calling for not more than 62% cacao bittersweet chocolate). Like, why the heck not make life simple and meet in the middle with 70% chocolate? I posed this question to the pastry chef who taught us macarons, and she postulated that by restricting the cacao content in the bittersweet chocolate, the recipe will have a higher proportion of milk solids which imparts a milkier undertone to the chocolate profile. If I just use a 70% chocolate instead of a combination of unsweetened and bittersweet, I may lose out on the milkiness that the recipe was aiming for. She commented that if in a pinch, one could add milk powder to the recipe.

Ingredients
115g (8 tablespoons/1 stick) unsalted butter, cut into thin slices/1/2-inch cubes
250g (9 ounces) bittersweet chocolate, no more than 62% cacao, finely chopped
80g (3 ounces) unsweetened chocolate, finely chopped
70g (1/2 cup) unbleached all-purpose flour
1/2 teaspoon baking powder
1/4 teaspoon fine sea salt
3 large eggs, at room temperature
280g (1 1/4 cups) castor sugar
2 teaspoons pure vanilla extract
340g (2 cups/12 ounces) semisweet chocolate chips
155g (1 1/2 cups OR 5 1/2 ounces) coarsely chopped pecans (optional)
125g (1 1/4 cups OR 4 1/2 ounces) coarsely chopped walnuts (optional)
Flaked sea salt, to taste (optional)
Steps
Position racks in the center and top third of the oven and preheat to 175C (350°F). Line baking trays with parchment paper. Place the bittersweet and unsweetened chocolate in a bowl. Sift the flour, baking powder, and salt together into a separate bowl.
Set a medium saucepan over the smallest flame possible and melt the butter directly over the flame. Add the chocolate, stirring until the mixture is smooth and no lumps remain. Remove the saucepan from the fire immediately and let cool, about 5 minutes.
Whisk the eggs with an electric mixer on medium-high speed until foamy and slightly thickened (about 30 seconds). Set the speed to high and gradually pour in sugar and vanilla and continue to whisk until the batter is very thick and pale yellow (about 2-3 minutes).
Reduce the mixer speed to medium and add the chocolate mixture. Once the mixture is combined, stop whisking. Stir in the flour mixture and then the chocolate chips, pecans, and walnuts, if using. Make sure the dry ingredients are distributed at the bottom of the batter as well.
Using 2 tablespoons (or a 2-inch ice cream scoop), portion the batter onto the prepared pans, placing the cookies about 1 ½ inches apart. Bake the cookies immediately for a shiny meringue surface. Bake for about 17 to 20 minutes, switching the position of the pans from top to bottom and front to back about halfway through baking, until the cookies are set around the edges (if you lift a cookie from the pan, the edges should release easily, even if the center of the cookie seems underdone), It's easy to overbake, so watch out!
Remove from oven and let cool on the baking trays.
Note:
The cookies can be stored in an airtight container at room temperature for up to 3 days. Separate each cookie layer with baking paper.
Growing up in a tropical country, it is the norm to seek shade whenever possible. When I first arrived in Melbourne half a decade ago, it boggled my mind to see people lounging on the school lawns catching some rays, but after one too many cold days spent with a three layers of clothes and a comforter around me, I'm beginning to come around to their idea.


Chocolate Chubbies
Adapted from Sarabeth's Bakery: From My Hands to YoursIngredients
115g (8 tablespoons/1 stick) unsalted butter, cut into thin slices/1/2-inch cubes
250g (9 ounces) bittersweet chocolate, no more than 62% cacao, finely chopped
80g (3 ounces) unsweetened chocolate, finely chopped
70g (1/2 cup) unbleached all-purpose flour
1/2 teaspoon baking powder
1/4 teaspoon fine sea salt
3 large eggs, at room temperature
280g (1 1/4 cups) castor sugar
2 teaspoons pure vanilla extract
340g (2 cups/12 ounces) semisweet chocolate chips
155g (1 1/2 cups OR 5 1/2 ounces) coarsely chopped pecans (optional)
125g (1 1/4 cups OR 4 1/2 ounces) coarsely chopped walnuts (optional)
Flaked sea salt, to taste (optional)
Steps
Position racks in the center and top third of the oven and preheat to 175C (350°F). Line baking trays with parchment paper. Place the bittersweet and unsweetened chocolate in a bowl. Sift the flour, baking powder, and salt together into a separate bowl.
Set a medium saucepan over the smallest flame possible and melt the butter directly over the flame. Add the chocolate, stirring until the mixture is smooth and no lumps remain. Remove the saucepan from the fire immediately and let cool, about 5 minutes.
Whisk the eggs with an electric mixer on medium-high speed until foamy and slightly thickened (about 30 seconds). Set the speed to high and gradually pour in sugar and vanilla and continue to whisk until the batter is very thick and pale yellow (about 2-3 minutes).
Reduce the mixer speed to medium and add the chocolate mixture. Once the mixture is combined, stop whisking. Stir in the flour mixture and then the chocolate chips, pecans, and walnuts, if using. Make sure the dry ingredients are distributed at the bottom of the batter as well.
Using 2 tablespoons (or a 2-inch ice cream scoop), portion the batter onto the prepared pans, placing the cookies about 1 ½ inches apart. Bake the cookies immediately for a shiny meringue surface. Bake for about 17 to 20 minutes, switching the position of the pans from top to bottom and front to back about halfway through baking, until the cookies are set around the edges (if you lift a cookie from the pan, the edges should release easily, even if the center of the cookie seems underdone), It's easy to overbake, so watch out!
Remove from oven and let cool on the baking trays.
Note:
The cookies can be stored in an airtight container at room temperature for up to 3 days. Separate each cookie layer with baking paper.