Chik's Crib

29 January 2021

Garlic and Onion Focaccia Recipe

January 29, 2021 0
Garlic and Onion Focaccia Recipe

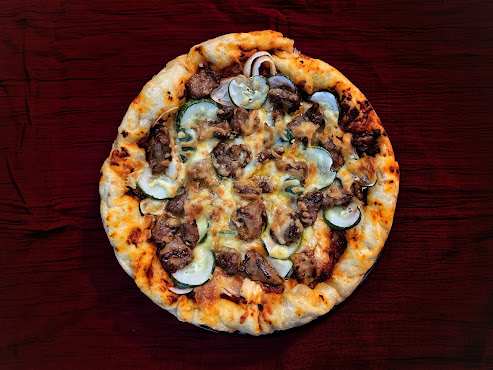
Continuing my new-found obsession with no-knead doughs, I spent a good part of December baking this focaccia dough in its various iterations. As a mark to how versatile this recipe is, and also how delicious it is, nobody got sick of me cooking the same thing over and over again. I've tried different toppings, played around with the sauce, and made the dough into thick-crust pizza, which was a rousing success. This dough develops a crisp golden base and a fluffy chewiness interior, and this texture plays off well with a layer of tomato, melted cheese, mushrooms and meat.


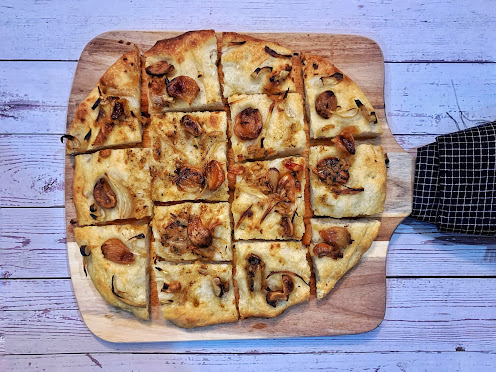
As good as pizza can be, the dough is just as good as its origin - a no-frills focaccia topped by aromatics that are found in every household. Savoury garlic cloves and sweet onions are cheap and abundant, and fills the kitchen with an intoxicating fragrance. 


Garlic and Onion Focaccia
Adapted from Garlic Focaccia at Serious Eats
If you don't have a cast-iron skillet (I know I don't...), you can get great results with stainless steel. I use a 11" stainless steel cake pan, which develops a crisper crust than a non-stick surface. 


INGREDIENTS

Focaccia Base

375g all-purpose or bread flour 

11g salt 

3g instant yeast

245g water  

3 tablespoons extra-virgin olive oil


Roasted Garlic 

2 heads of garlic, whole 

1 tablespoon (15ml) extra-virgin olive oil

1 tsp salt


Garlic Butter (optional)

2 tablespoons (30g) unsalted butter

1 tablespoon extra-virgin olive oil

2 teaspoons dried oregano

1/2 teaspoon red pepper flakes


STEPS

For the Roasted Garlic:
Adjust oven rack to center position and preheat oven to 350°F (180°C).

Break the heads of the garlic apart slightly. On a sheet of aluminum foil, drizzle the garlic with 1 tablespoon (15ml) olive oil and sprinkle with salt. Leave each garlic clove uncut: roasted whole garlic cloves are sweet and fragrant, which slicing into the garlic cloves, even a little, will result in a harsh and pungent garlicky taste. Wrap tightly with foil and roast for about an hour, until garlic is completely tender. Let cool and refrigerate until use.

For the Garlic Butter:
Mince 4 raw cloves of garlic. Combine remaining 1 tablespoon (15ml) olive oil with butter in a small skillet and melt over medium-low heat. Add garlic, oregano, and pepper flakes and cook, stirring, until fragrant and garlic is just beginning to brown, about 1 minute. Transfer to a small bowl and lightly season with salt. Set aside.

For the Focaccia
In a large bowl, mix flour, salt, yeast and water until there are no pockets of dry ingredients. (The bowl should be large enough to accommodate the dough proofing, which can triple in size.)

Cover bowl with plastic wrap, then allow dough to rest at room temperature for at least 8 hours, and up to 24 hours. In a warm environment, the dough may overproof near the end of that range. Dough should rise dramatically and fill bowl.

Add 3 tablespoons (45ml) olive oil to your stainless steel pan. Do not flour the pans. Tip your dough out of the bowl and onto the stainless steel pan, and coat the surface with the olive oil. Press the dough flat and outwards, spreading oil around the bottom and up the sides of the pan as you do so. Cover tightly with plastic wrap and let dough stand at room temperature for 2 hours.

After 2 hours, the dough should be relaxed and mostly filled up to the edges of the pan. Using your fingertips, burst any large bubbles that appear. Gently lift off one edge of the dough to let air bubbles underneath escape, then repeat along the other edges until there are no more air bubbles and the dough is evenly spread around the pan.

Peel the roasted garlic cloves. Embed whole roasted garlic cloves evenly over surface of dough. Add onion slices.

When ready to cook, set a tray at the lowest rack. Preheat oven to maximum temperature (which is about 210C for mine). As you put the focaccia in, turn off the top heating coil (leaving only the bottom coil on.) Bake for 20-25 mins, until the bottom is browned and crisp (you can remove the focaccia from the oven and inspect with a thin spatula. If bottom is not as crisp as desired, return to oven.) Then, turn on the top coil and transfer the focaccia to the top rack. Bake for another 3-4 mins, until the top has reached it's desired colour. Remove from oven and drizzle with garlic butter (as below).

Remove focaccia from the pan and leave it to cool slightly on a rack. This prevents steam from accumulating and softening the crust.

18 January 2021

Baked Camembert Recipe

January 18, 2021 0
Baked Camembert Recipe


I’ve been a big fan of baked Camemberts since my road trip through New Zealand. After a lovely store assistance took us through her way of baking Camembert, my life has never been quite the same. It took my family a few years to cotton onto the delight of a hot melting wheel of cheese, but I can proudly say now that they’re 100% on board with the idea. 

Part of my New Years' resolution is to eat healthier, and aside from increasing my intake of greens (yes, how we love people who brags about how healthy they're eating =.=), but more interestingly, this recent medical report from the Journal of Alzheimer's Disease caught my eye. This little tidbit, for example: 

  1. Cheese, by far, was shown to be the most protective food against age-related cognitive problems, even late into life;
  2. The daily consumption of alcohol, particularly red wine, was related to improvements in cognitive function;

So, as part of my new resolution for a healthier diet, I'll commence a habit of drinking red wine daily. And y'know, workin' on my night cheeseAll in the name of healthy living, obviously. 

Now pass the bottle of red wine.

The sun almost fully set by the time this picture was taken (hence the drop in photo quality!), but just look at the ooze on that cheese
The sun had almost fully set by the time this picture was taken (hence the drop in photo quality!), but just look at the ooze on that cheese. 


Baked Camembert 

Inspired from Baked Camembert on BBC Food 

Baking a wheel of cheese deepens their flavour and make it more pronounced. I find milder cheeses best for baking, and save the stronger cheeses for eating as is. 

INGREDIENTS

1 wheel of camembert
1 garlic clove, finely minced
3-4 sprigs fresh thyme
1-2 tsp honey
Sliced sourdough, to serve

STEPS

Preheat the oven to 200C.

Using a knife, gently cut and separate the top 0.5 cm of the camembert from the rest of its body. Sandwich the garlic, thyme and a drizzle of honey between the two layers of the camembert.

Place cheese in a small oven proof bowl and set it on a baking sheet. Add sliced sourdough to the baking sheet in a single layer. Bake in the oven for ten minutes, until the centre of the cheese is melted. Serve immediately. 

12 December 2020

Thick Crust Pizza Recipe - For the Ordinary Oven

December 12, 2020 0
Thick Crust Pizza Recipe - For the Ordinary Oven


Despite being over a decade when I stepped food in Italy, I still remember one of the local pizzeria that we stopped in. In that pizzeria, I had a slice of pizza that defined the gold standard for thick-crust pizza. I was frozen from a night-time wintertime walk to the diner, running on a body clock that was decidedly not dinner-time, and more than a tad grouchy after a walk in subzero temperatures. But the pizza was so astonishing, my mood did a 180 degrees turn. The pizza had a crisp base fired to a gorgeous golden brown, and crunches delightfully with every bite. It was something of a revelation. 


The restaurant cemented a special place in my heart for another reason: I gave a shock to the owner by telling him that I’d never had an espresso before. (What? It was my first night in Italy...) He was stunned, and despite being close to midnight, he made a shot of espresso for me on the house, just so I could no longer make that claim. 


The event was so memorable, so much so that when I made Kenji’s garlic focaccia recipe, the crispiness of the base brought back the memory of their formidable pizzas. And one afternoon when I finally gave it a go, it was as good as I had dreamt it would be. 


Recipe for Thin Crust Pizza Recipe for the Ordinary Oven

Recipe for Pizza on a Grill


Thick Crust Pizza Recipe 
Adapted from Garlic Focaccia at Serious Eats
If you don't have a cast-iron skillet (I know I don't...), you can get great results with stainless steel. I use a 11" stainless steel baking pan, which develops a crisper crust than using non-stick pans. I usually omit the garlic butter for ease of cooking, but layering this with tomato puree as a sauce base would be rather decadent.


Last updated on May 26


INGREDIENTS

Pizza Sauce

1 whole head garlic

1 tablespoon (15ml) extra-virgin olive oil

1 tsp salt
80g tomato paste

Pizza Base

375g all-purpose or bread flour

11g salt

3g instant yeast

245g water 

3 tablespoons extra-virgin olive oil


STEPS
For the Pizza Sauce
Adjust oven rack to center position and preheat oven to 350°F (180°C).

Break a head of the garlic apart slightly. On a sheet of aluminum foil, drizzle the garlic with 1 tablespoon (15ml) olive oil and sprinkle with salt. Leave each garlic clove uncut: roasted whole garlic cloves are sweet and fragrant, which slicing into the garlic cloves, even a little, will result in a harsh and pungent garlicky taste. Wrap tightly with foil and roast for about an hour, until garlic is completely tender. Peel the roasted garlic cloves and discard the skin. Mash the garlic flesh and combine with tomato paste. Add oregano or thyme to taste.

For the Pizza Base

In a large bowl, mix flour, salt, yeast and water until there are no pockets of dry ingredients. (The bowl should be large enough to accommodate the dough proofing, which can triple in size.)

Cover bowl with plastic wrap, then allow dough to rest at room temperature for at least 8 hours, and up to 24 hours. In a warm environment, the dough may overproof near the end of that range. Dough should rise dramatically and fill bowl.


Add 3 tablespoons (45ml) olive oil to your stainless steel pan. Do not flour the pans. Tip your dough out of the bowl and onto the stainless steel pan, and coat the surface with the olive oil. Press the dough flat and outwards, spreading oil around the bottom and up the sides of the pan as you do so. Cover tightly with plastic wrap and let dough stand at room temperature for 2 hours.

After 2 hours, the dough should be relaxed and mostly filled up to the edges of the pan. Using your fingertips, burst any large bubbles that appear. Gently lift off one edge of the dough to let air bubbles underneath escape, then repeat along the other edges until there are no more air bubbles and the dough is evenly spread around the pan.

Top with mozzarella cheese. Add other toppings of your choice, which could be raw onions, pre-cooked sliced meat, mushrooms, sliced pepperoni or sausages. (If using seafood such as prawns or squid, don't add the cooked seafood in at this stage, because it will overcook in the oven. Add the seafood in after the pizza is done.) Smear the pizza sauce over the toppings in thick stripes (As you can see from the photo above, I left a rim without toppings, which doesn't really add any benefits to the taste, and I no longer do so.) 

When ready to cook, set a tray at the lowest rack. Preheat oven to maximum temperature (which is about 210C for mine). As you put the pizza in, turn off the top heating coil (leaving only the bottom coil on.) Bake for 30-45 mins, until the bottom is browned and crisp (you can remove the pizza from the oven and inspect with a thin spatula.  If bottom is not as crisp as desired, return to oven.) Then, turn on the top coil and bake for another 5 mins, until the cheese is bubbling and browned. Remove pizza from the pan and leave it to cool slightly on a rack. This prevents steam from accumulating and softening the crust.

Protip! If using a pizza stone or pizza steel, set it on the lowest rack and preheat your oven for an hour prior to baking the pizza. Bake for 15 minutes using only the bottom coil, then for 15 minutes using both top and bottom coil.

Additional Notes
It’s fine if your oven is unable to toggle the top and bottom heating coils on and off. The base will likely remain underdone when the top has finished cooking, but you can just finish the pizza on the stove. I would lift the undercooked bottom off the pan, drizzle a generous amount of olive oil into the pan to help the bottom crisp, and cook over medium heat to desired brownness.

You may also get a crispier bottom by first cooking the pizza dough in the pizza pan over your stove for a couple of minutes, before baking in the oven (until the top is done), then finish it back over the stove (until the base gets to the level of crispiness that you want). It’s a bit more work, but it may get better results.

07 December 2020

Taro Milk Shake Recipe - A Milksha Copycat

December 07, 2020 0
Taro Milk Shake Recipe - A Milksha Copycat


This is another of my milksha-inspired drink. It's a combination of two rich-tasting ingredients in a cup of deliciousness. Still, making this at home entails peeling a taro (you might want to wear gloves because direct skin contact with raw taro can be itchy), steam the taro, mash it then chill it before you can finally enjoy the fruits of your labour. 

Did this put you off off trying this recipe? (Great going, me.) Maybe it depends on how large your appetite is for a hearty cup of taro milk shake, or how many people in your vicinity is craving a cup of taro milk shake. Would I make it again? Eh, maybe. Or I can just buy a fresh cup from milksha whenever the mood strikes. 

Taro Milk Shake Recipe

Makes about 6-8 drinks. Do you have the appetite?

INGREDIENTS
300-400g, about half a medium sized taro

20g caster sugar

Large pinch of salt

Full cream milk, adjusted to taste

STEPS
Peel taro until there's no brown bits left on the flesh, and cut the taro flesh into 2-3 inches cubes. Place in steamer and steam for about 30-45 mins, until softened and can be easily smashed.

Add sugar and salt to the hot taro, and mash until well incorporated. For every 300g of taro, you want about 20g sugar. Let chill completely in the fridge. This mixture can be covered and kept in the fridge for a couple of days. 

When ready to serve, add a couple of scoops of mashed taro (about 50g) to a glass of milk. Combine using a fork or whisk (or a handheld blender for the best effect.) Serve immediately. 

20 November 2020

Thin Crust Pizza Recipe - for the Ordinary Oven

November 20, 2020 0
Thin Crust Pizza Recipe - for the Ordinary Oven


We all know the drill.

Setting your oven to 290C or greater will give your pizza that nice blistered crust. A pizza stone is porous and has a high Specific Heat Capacity, and so baking pizzas on one gives the crust a bit more of a crisp. A cast-iron pan is a viable alternative, and also frames the pizza for an oh-so-instagramable photo.

If you have an oven capable of reaching 290C, or have high maintenance cast-iron pans or dedicated pizza making equipment around, this is not the pizza recipe for you. For the rest of us who craves pizza three times a week but don't have shelf space or money for all these special equipment, welcome! Despite using stainless steel sheet pans (salvaged from ancient toasters and the likes) and an oven that tops at 210C, my sister calls this the best pizza she had in a long time. That makes me pretty confident that anyone can do this with their existing home equipment too.

A pizza dinner can feel like a special affair, but it isn't meant to be expensive. After all, it started off as food for the working poor, who needed something hot, filling and to be eaten on-the-go. I like my pizzas with a heap of onions, which is inexpensive and melds into something sweet and wonderful in the oven. Shiitake mushrooms is always a good option, and literally any protein you find hanging around your freezer can find its way into a pizza easily. Leftover salmon or frozen prawns, sausages and bacon, and any and all bits of minced or sliced meat in the freezer. I unfreeze whatever I see, and then hunt around the spice cupboard and fridge for sauces and seasonings. Think of this pizza as a casserole - one with a crisp flatbread and topped with an abundance of cheese.


Thin Crust Pizza Recipe - for the Ordinary Oven  

Adapted from Foolproof Pan Pizza Recipe by Serious Eats
Makes for 3 medium sized (11x8") pizzas
The pizza dough has plenty of downtime waiting for the dough to proof. But on the bright side, there's not too much work involved, and it can be a fun family activity for any young 'uns around the house. This is another winning recipe from the team at Serious Eats, and I've come to realise that I'd never done a recipe from them that didn't turn out perfect. They have several other pizza dough recipes, including one New York style and a Neapolitan Pizza version. There are many different styles of pizza which can be quite intimidating, but this guide from King Arthur is a good one to start off with.

Last updated May 26


INGREDIENTS

400g bread flour, plus more for dusting
10g salt
4g instant yeast (about 1 teaspoon)
275g water
8g extra-virgin olive oil (0.25 ounces; about 2 teaspoons), plus more to coat pans and for drizzling
1 1/2 cups canned tomato puree, or a pizza sauce such as New York–style pizza sauce
300g shredded mozzarella, or a combination of mozzarella with other shredded cheeses (such as cheddar)
Toppings - see below for suggestions


STEPS
In a large bowl, mix flour, salt, yeast, water, and oil until there are no pockets of dry ingredients. (The bowl should be large enough to accommodate the dough proofing, which can triple in size.)

Cover bowl with plastic wrap, then allow dough to rest at room temperature for at least 8 hours, and up to 24 hours. In a warm environment, the dough may overproof near the end of that range. Dough should rise dramatically and fill bowl.

Pour 1 to 2 tablespoons olive oil in the bottom of 3 pans. Dust your work surface, hands and the top of the dough with flour, and divide the dough into 3 pieces. Form each into a ball by holding it with well-floured hands and tucking the dough underneath itself. Rotate until a tight smooth surface is formed.

Place each ball of dough in the prepared pizza pan, turning to coat the dough with olive oil. Press the dough flat and outwards to the edge of the pan as possible. It'll shrink back inwards now, that's normal. Cover with plastic wrap and let the dough rest at room temperature for about 2 hours.

After 2 hours, the dough would be more relaxed, and you should be able to coax it to the edges of the pan. Using your fingertips, burst any large bubbles that appear. Gently lift off one edge of the dough to let air bubbles underneath escape, then repeat along the other edges until there are no more air bubbles and the dough is evenly spread around the pan.

Top each dough with a layer of tomato purée, up to the very edge of the dough. Add desired toppings (see below). Sprinkle with cheese, again all the way to the edges.

Set a tray at the lowest rack. Preheat oven to maximum temperature (which is about 210C for mine). As you put the pizza in, turn off the top heating coil (leaving only the bottom coil on.) Bake for 20-25 mins, until the bottom is lightly browned and crisp (you can remove the pizza from the oven and inspect with a thin spatula. If bottom is not as crisp as desired, return to oven.) Then, turn on the top coil and bake for another 5 mins, until the cheese is bubbling and browned.

Allow the pizza to cool slightly before serving.

Additional Notes
It’s fine if your oven is unable to toggle the top and bottom heating coils on and off. The base will likely remain underdone when the top has finished cooking, but you can just finish the pizza on the stove. I would lift the undercooked bottom off the pan, drizzle a generous amount of olive oil into the pan to help the bottom crisp, and cook over medium heat to desired brownness.

You may also get a crispier bottom by first cooking the pizza dough in the pizza pan over your stove for a couple of minutes, before baking in the oven (until the top is done), then finish it back over the stove (until the base gets to the level of crispiness that you want). It’s a bit more work, but it may get better results.


Toppings:
Sliced onions, shiitake mushrooms, roasted garlic help fill out your pizza and give layers of taste and texture.

Proteins (poultry, lamb or beef or pork) is always welcome. These can be minced or sliced. You will need to cook the meat prior to adding it to the pizza. I like seasoning the meat with thyme, cumin, salt and pepper (with a couple of teaspoons of baking soda to tenderise the meat), and sauté over medium heat until cooked. Premixed seasoning or sauces (even Lee Kum Kee) would work too.

Seafood: salmon, prawns, squid. These should be cooked prior. Do not add it to the pizza before baking the pizza off, as the seafood will overcook in the oven. Cook the pizza to completion, then add the seafood in. My new favourite pizza has a combination of thinly sliced kimchi, prawns, mushrooms, garlic and onions.

Pepperoni or sausages, sliced.

For a fancy take:
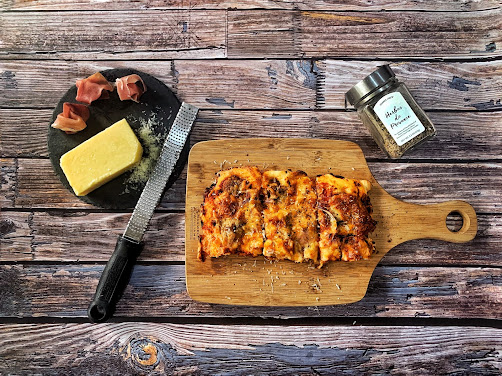
Bake a plain pizza (no cheese or tomato). Let cool, then smear a layer of burrata cheese, greens (like a combination of basil leaves and the likes), whole toasted pistachio, and slices of prosciutto. 

Grate Parmesan or Pecorino Romano cheese over finished pizza.